

Cognito Forms is a powerful form builder used by educators, training companies, nonprofits, and professional services teams worldwide. Beyond collecting data, it supports conditional logic, advanced calculations, payment processing, e-signatures, and workflow automation. It is also used heavily for course completions, event registrations, assessments, and compliance tracking, all scenarios where issuing a certificate at the end of the process makes sense.
The good news is that Cognito Forms has a built-in document generation feature that can produce certificates automatically from form submissions. The not-so-good news is that this feature has real limitations when it comes to professional-grade certificate issuance. This guide covers both: how the native feature works, where it falls short, and what a better alternative looks like.
Method 1: Cognito Forms' Built-In Document Generation
Cognito Forms includes a native document generation feature that lets you convert form entries into PDF or Word documents automatically. Here is how it works.
How It Works
Cognito Forms offers two template types for document generation.
Standard Templates are the simplest option. They pull all form submission details into a pre-formatted document with minimal setup. You choose what to include, such as your logo, form title, and field values, and the system handles the formatting automatically. Standard templates are ready in minutes and require no design work, but the output is basic and the layout is not customizable.
Custom Templates give you full control over layout, branding, and content. You download a standard Word document from Cognito Forms, open it in Microsoft Word, Google Docs, or any word processor that supports .docx files, and customize the design. You then insert merge syntax throughout the document to pull in form data dynamically. For example, {CustomerName} pulls in the respondent's name, {CourseTitle} pulls in the course name, and {each Section} loops through repeating data. Once your template is ready, you upload it back to Cognito Forms, set the output format to PDF or Word, and it generates a document for every new submission.
Step-by-Step Setup
Step 1: Build your form. Add all fields that need to appear in your certificate, including the respondent's name, course title, date, and any other relevant details. Cognito Forms recommends adding fields before building your document template so the merge tags are available during setup.
Step 2: Choose a document template. Access the Manage Document Templates dialog from your form's confirmation message, email notifications, or the Entries page. Select an existing template or create a new one. Enter the file name, description, and role.
Step 3: Configure your template type. For a basic certificate, the Standard Template works as a starting point. For a branded, professionally designed certificate, choose Custom Template.
Step 4: Create your custom template. Download the standard .docx template from Cognito Forms, open it in Word or Google Docs, and redesign it to match your brand. Insert merge tags such as {FirstName}, {CourseName}, and {CompletionDate} wherever you want dynamic content to appear. You can add conditional sections using {if FieldName} syntax and loop through repeating data using {each SectionName}. When done, save as .docx and upload back to Cognito Forms. Set the output format to PDF if you want a non-editable certificate.
Step 5: Set up delivery. Cognito Forms gives you three delivery options. You can show a download link on the confirmation page after submission, attach the document to an automated email notification, or make it downloadable from the Entries page for manual distribution.
Step 6: Test before going live. Generate a test document from any entry on your Entries page, review it for accurate data placement and formatting, make adjustments if needed, then switch the template from Test mode to Live mode. Note that Test mode adds a watermark to all generated documents.
Cons: Cognito Forms' Built-In Certificate Feature
The native document generation feature is useful for basic scenarios, but it has meaningful limitations when certificate issuance is the primary goal.
Design requires technical effort. Creating a professional-looking certificate means building a custom .docx template in Word or Google Docs using Cognito Forms' merge syntax. For non-technical users, this is a steep learning curve and the results rarely match what a purpose-built certificate tool can produce.
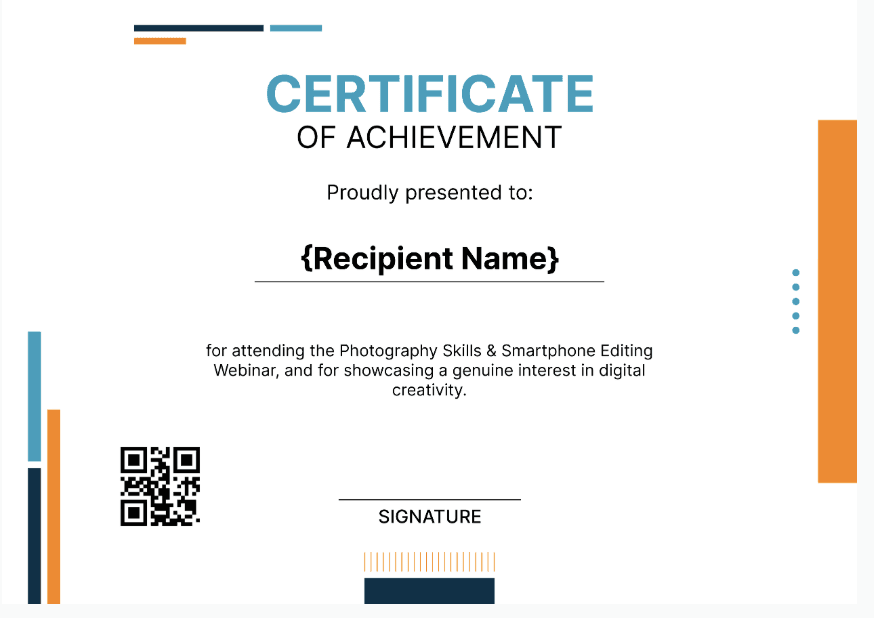
No credential-specific features. Cognito Forms generates a PDF, but not a verifiable credential. There are no unique certificate IDs, no QR verification codes, and no shareable verification links. Recipients have no way to prove their certificate is authentic.
The watermark trap. Custom templates display a Cognito Forms watermark in Test mode. Many users do not realize their certificates are going out watermarked until a recipient flags it. Removing it requires switching to Live mode, which activates the $4 per template per month charge :(
Limited delivery options. Certificates can be attached to a notification email or downloaded from the Entries page. There is no LinkedIn share, no recipient portal, and no Apple Wallet support. Multi-channel delivery requires additional integrations.
No engagement tracking. Once a certificate is sent, Cognito Forms has no visibility into what happens next. You cannot see who opened, downloaded, or shared their certificate.
Bulk sending is not supported. You can download past certificates in bulk from the Entries page, but you cannot email them in bulk to past respondents. Sending historical certificates still requires manual effort.
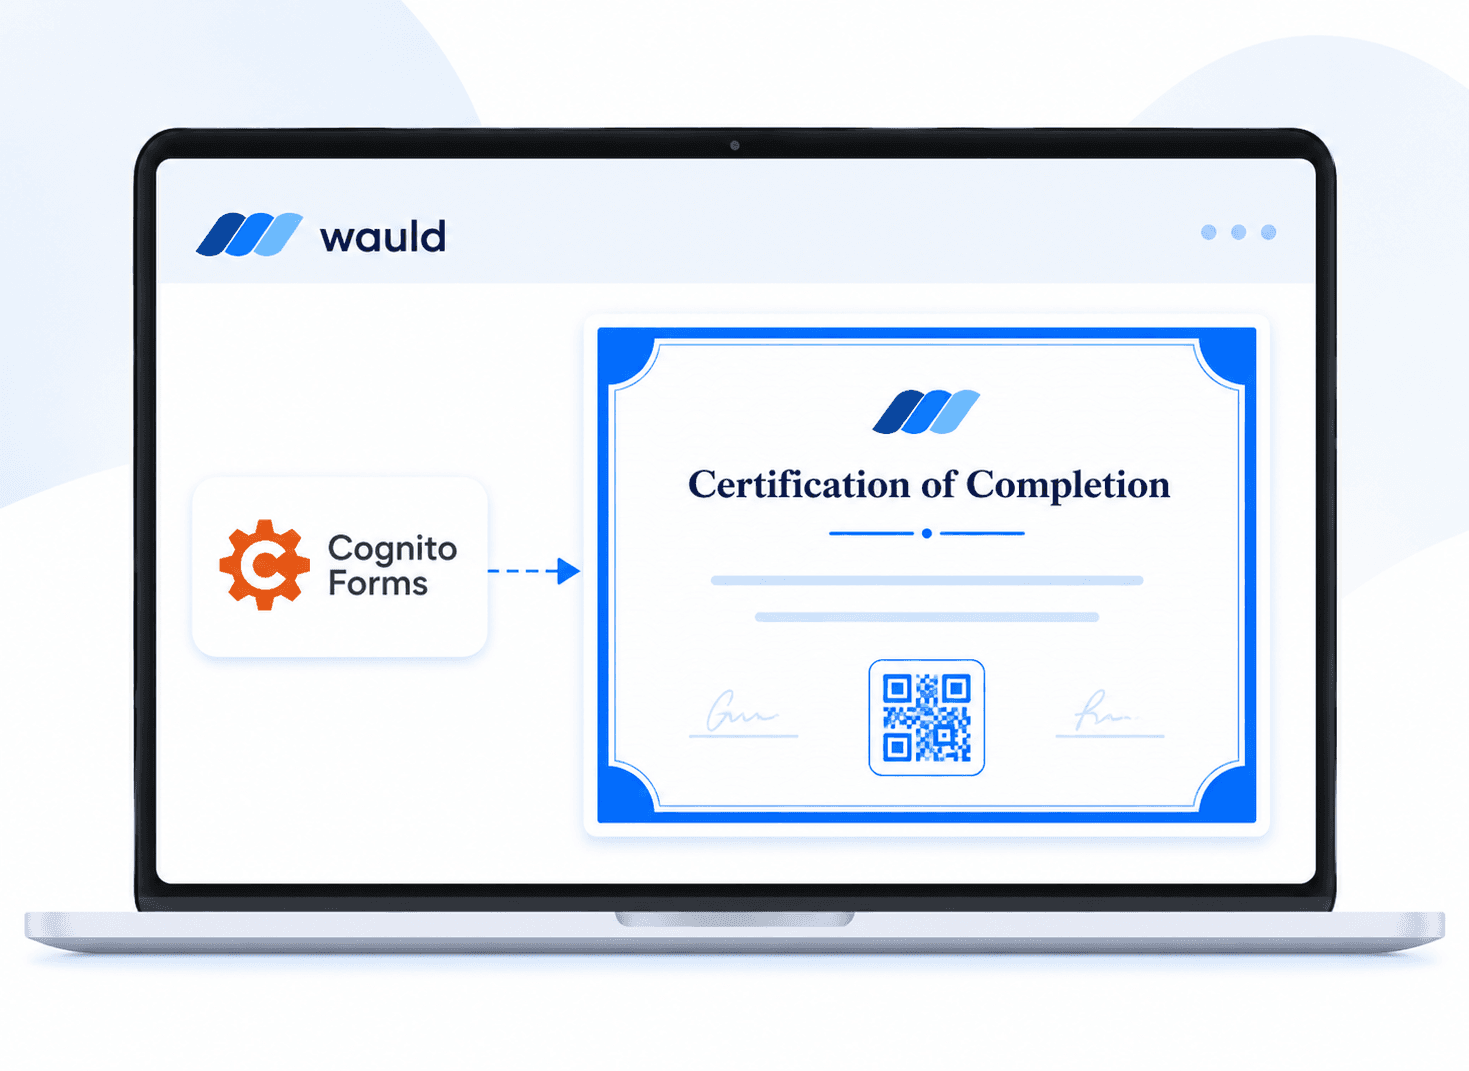
Method 2: Automate Certificate Issuance with Wauld
For organizations that need professional-grade certificates with real credential features, Wauld is purpose-built for exactly this workflow. It connects to Cognito Forms via Zapier, direct webhooks, or Pabbly Connect, and handles the full lifecycle of a certificate from design through delivery and tracking.
What Wauld Adds
Where Cognito Forms generates a PDF, Wauld generates a credential. Every certificate produced by Wauld includes a unique certificate ID, a QR verification code, and a shareable verification link that anyone can use to confirm the certificate is authentic. Recipients can download their certificate as a PDF or PNG, share it directly to LinkedIn, or store it in their Wauld recipient portal accessible at any time.
Wauld also gives you access to 900+ professionally designed certificate templates that you can customize to your brand in a visual drag-and-drop editor, no Word document merge syntax required. You map your Cognito Forms fields to dynamic merge tags within Wauld's interface, and every submission populates a personalized, branded certificate automatically.
From the Wauld dashboard, you can track who has opened, downloaded, and shared their certificate, including LinkedIn profile additions and verification activity. You can also re-issue certificates to specific recipients with one click, and bulk generate certificates for historical Cognito Forms entries you never processed before.
How to Integrate Cognito Forms with Wauld
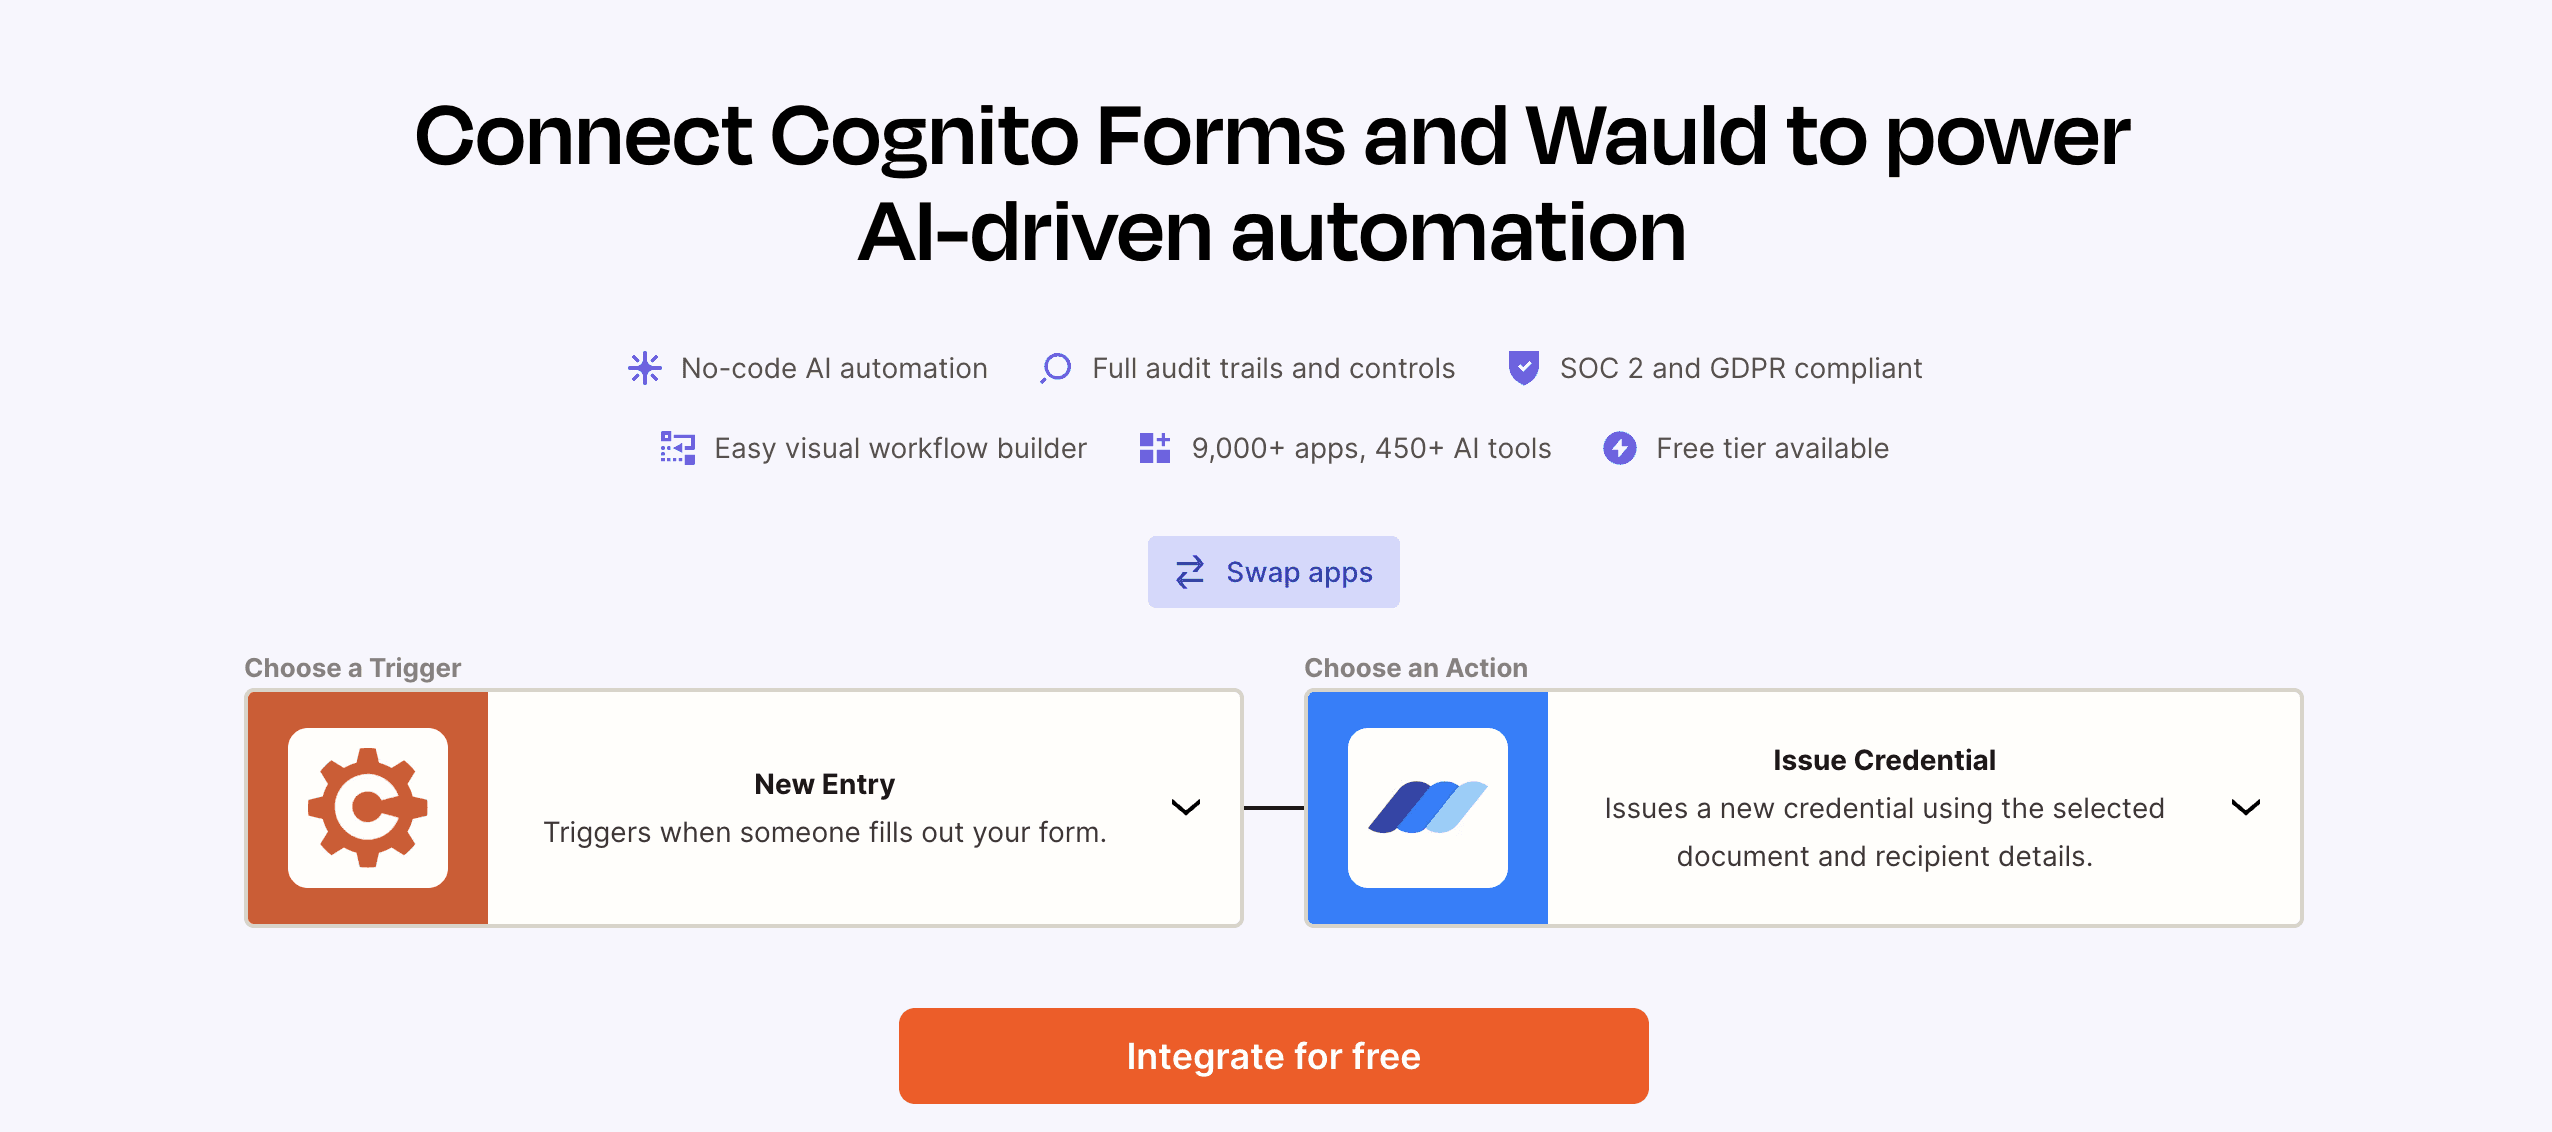
Via Zapier: In Zapier, create a new Zap with Cognito Forms as the trigger and "New Entry" as the event. Connect your Cognito Forms account, select your form, and run a test to confirm all fields appear correctly. Set Wauld as the action, select "Generate Document," choose your certificate template, and map your Cognito Forms field values to the corresponding Wauld merge tags. Add any additional delivery steps such as Gmail or Google Drive, then turn on the Zap. Wauld's free plan includes Zapier connectivity.
Via Direct Webhook: In Wauld, go to Integrations, then Webhooks, and create a new endpoint. Copy the endpoint URL. In Cognito Forms, go to your form settings, open the Webhooks section, and add a new webhook pointing to the Wauld URL. Submit a test entry, confirm the payload arrived in Wauld, map your field names to your template merge tags, configure delivery, and you are live. This is the lowest-latency option and requires no third-party automation platform.
Via Pabbly Connect: In Pabbly Connect, create a new workflow with Cognito Forms as the trigger. Pabbly will generate a webhook URL. Paste this into your Cognito Forms webhook settings, submit a test entry, then set Wauld as the action. Map your fields, configure delivery, and activate the workflow. Pabbly Connect's flat monthly pricing makes it a cost-effective option for high-volume Cognito Forms submissions.
Which Method Is Right for You
Cognito Forms' built-in document generation is the right starting point if you need basic PDFs from form submissions and do not require credential-specific features. It is already included in your Cognito Forms plan, requires no additional tools, and works well for internal documents, receipts, and simple confirmations.
Wauld is the right choice if you need certificates that look genuinely professional, carry verifiable credentials, are delivered automatically with tracking, and scale to any volume without manual effort. It takes about an hour to set up and runs without ongoing maintenance once the integration is live.
FAQs on Cognito Forms Certificate Generator
Answers to common questions about generating documents and certificates with Cognito Forms


