How to Combine First and Last Names in Excel (7 Methods)

If your first and last names sit in separate columns, you hit a wall. Mail merges, email lists, and certificate batches all need one combined name column. Excel handles this in several ways, and the right formula depends on your data.
This guide covers every method to combine first and last name in Excel. Each Excel formula and feature below comes with clear, numbered steps. It also flags common mistakes that cause messy or broken results.
Before You Start: Prep Your Excel Spreadsheet
Combining first and last names starts with clean source data in your worksheet. Run through this short checklist before writing a single formula.
- Keep first name and last name in separate, clearly labeled columns.
- Scan for stray spaces before or after names in each cell.
- Decide your output format upfront, such as "First Last" or "Last, First."
- Remove blank rows in the middle of your list before combining.
| Prep Step | Why It Matters |
|---|---|
| Separate columns for first and last name | Every method below assumes this column structure |
| Trim stray spaces | Prevents results like "JaneSmith" or "Jane Smith" |
| Confirm output format | Avoids redoing the combine later |
| Remove blank rows | Keeps Flash Fill and Power Query patterns clean |
Method 1: Combine First and Last Name Using the Ampersand Operator
The ampersand operator is the fastest way to combine two cells in Excel.
Excel Formula
Type this formula in the cell where you want the combined name:
=A2 & " " & B2
Steps:
- Click the cell for your combined name, such as C2.
- Type the formula, using your own first name and last name cells.
- Add a space character between the two, enclosed in quotation marks.
- Press Enter to see the combined result.
- Drag the fill handle down the entire column to fill the rest.
Change the connector text between the two cells for other formats:
=B2 & ", " & A2combines two cells as "Smith, Jane"=A2 & "-" & B2produces "Jane-Smith"
This works whether your names sit in column A or column B. For Microsoft's own walkthrough, see Microsoft Support's guide to combining text.
Best for: quick, one-off merges with no extra functions needed.

Using the ampersand (&) operator to combine first and last names into a single full name column in Excel.
Method 2: Combine First and Last Name with the CONCATENATE Function
The CONCATENATE function combines first and last name using function syntax.
Excel Formula
=CONCATENATE(A2, " ", B2)
Steps:
- Select the cell for your combined name.
- Enter the formula above using the concatenate function.
- Press Enter, then drag the fill handle down.
Using the CONCATENATE Function Today
Microsoft now treats CONCATENATE as a legacy function for concatenation. It still runs in Microsoft 365, Excel 2024, 2021, and 2019. CONCAT is the newer, recommended replacement going forward.
Best for: older Excel files still built around legacy formulas.

Using the CONCATENATE function to merge first and last names into a single Full Name column in Excel.
Method 3: Combine Names in Excel Using the CONCAT Function
CONCAT was added to Microsoft Excel in 2016 to replace CONCATENATE.
Excel Formula
=CONCAT(A2, " ", B2)
Steps:
- Click the cell where you want the result.
- Enter the concat function with your own cell references.
- Press Enter and drag the fill handle down.
CONCAT is available in Excel 2016 through Excel 2024, and Microsoft 365. It behaves like the ampersand operator in everyday use. For the full syntax breakdown, see Microsoft Support's CONCAT function page.
Best for: anyone on Excel 2016 or later avoiding legacy functions.

Using the CONCAT function to combine first and last names into a single Full Name column in Excel.
Method 4: Combine First and Last Name Using the TEXTJOIN Function
TEXTJOIN is the strongest choice for a first, middle, and last name.
Excel Formula
=TEXTJOIN(" ", TRUE, A2, B2, C2)
Steps:
- Select the cell for your combined name.
- Set the delimiter as the first argument, such as a space.
- Set the second argument to TRUE to skip any empty cells.
- List each name cell you want joined, such as A2, B2, and C2.
- Press Enter and drag the fill handle down.
You can omit a name part entirely if a middle name column is blank. TEXTJOIN runs in Excel 2019, 2021, 2024, and Microsoft 365. It is still not available in Excel 2016 or earlier versions. See Microsoft Support's TEXTJOIN function page for the full syntax.
Best for: lists with a first, middle, and last name.
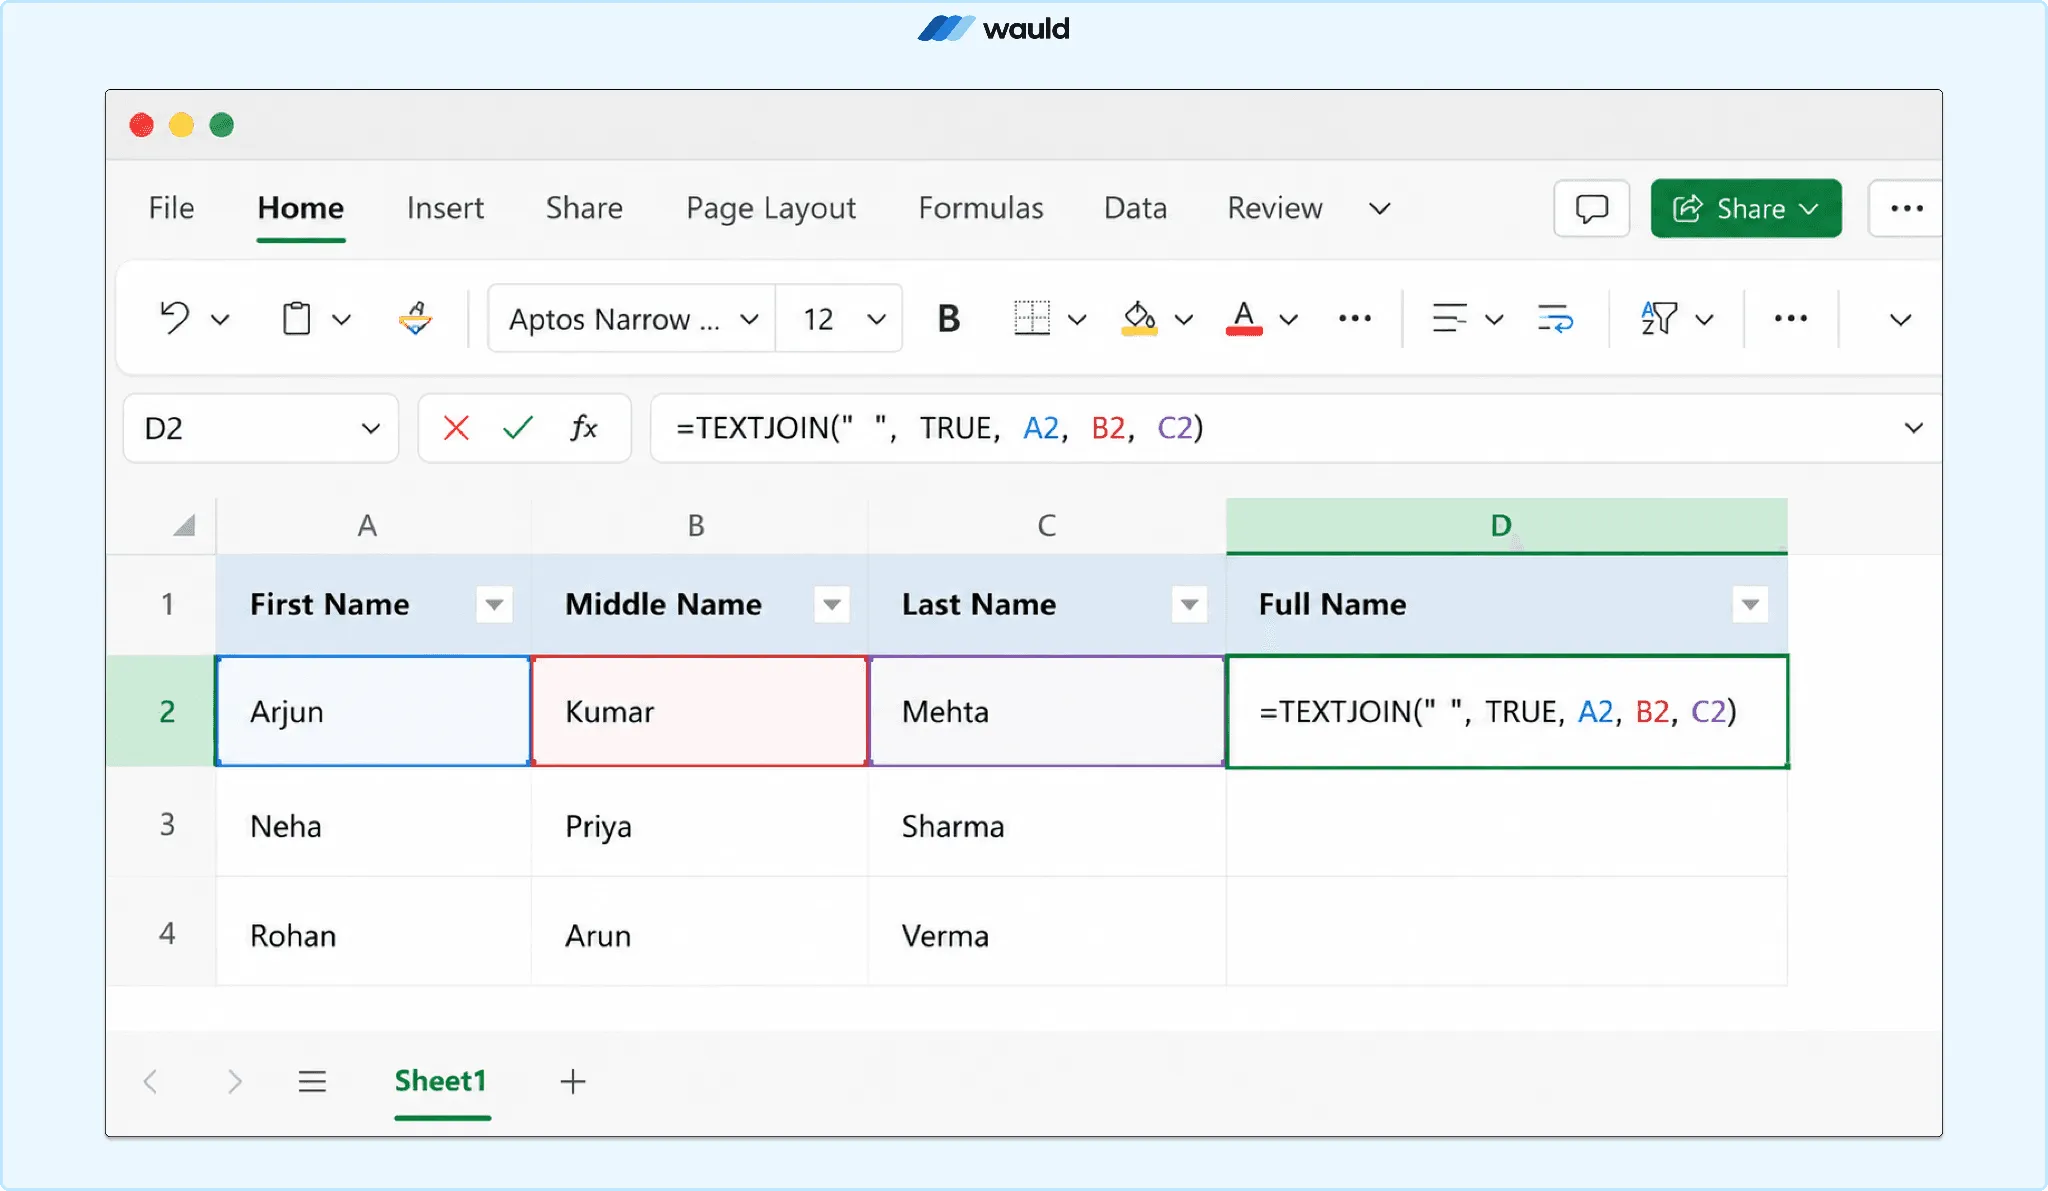
Using the TEXTJOIN function to merge first, middle, and last names into a single Full Name column in Excel.
Method 5: Using Flash Fill to Combine Names in Excel Automatically
Flash Fill is a quick way to combine names without any formula. It spots a pattern from one example and fills in the rest automatically.
Steps:
- In the first row, manually type the full name you want.
- Press Enter, then start typing the next name below it.
- Accept the gray preview Excel suggests for the remaining rows.
- If nothing appears, press Ctrl + E, or Command + E on Mac.
Best for: a one-time cleanup on a list you will not update soon.
Using Flash Fill will not update names in Excel automatically. It produces static text, not a live formula. If your source names change later, you will need to redo it.

Using Flash Fill (Command + E or Ctrl + E) to automatically combine first and last names into a Full Name column in Excel.
Method 6: Merge First and Last Name Using Power Query
Power Query is another way to combine first and last name in Excel automatically. Power Query suits name data you import on a regular basis.
Steps:
- Select your data range and convert it to a table.
- Go to Data, then From Table/Range, to open Power Query.
- Select both name columns, holding Ctrl to multi-select.
- Right-click the column headers and choose Merge Columns.
- Choose a separator, such as space or comma, for the new column.
- Click OK, then Close & Load to return the result.
Power Query turns two columns into one clean, refreshable column. It is a strong option once your clean data feeds into pivot tables.
Best for: recurring imports, large datasets, or existing Power Query users.
Method 7: Fix Capitalization with TRIM and the PROPER Function
Two small functions fix most messy data problems in combined names.
Excel Formula
| Function | What It Fixes | Example Formula |
|---|---|---|
| TRIM | Extra spaces from copied or imported cell values | =TRIM(A2) & " " & TRIM(B2) |
| PROPER | Inconsistent capitalization, like "jane SMITH" | =PROPER(A2 & " " & B2) |
| Both combined | Spacing and capitalization together | =PROPER(TRIM(A2) & " " & TRIM(B2)) |
PROPER capitalizes each word in the name. LOWER converts everything to lowercase instead, if that format fits better. Use the combined formula whenever names come from an external form or sheet.
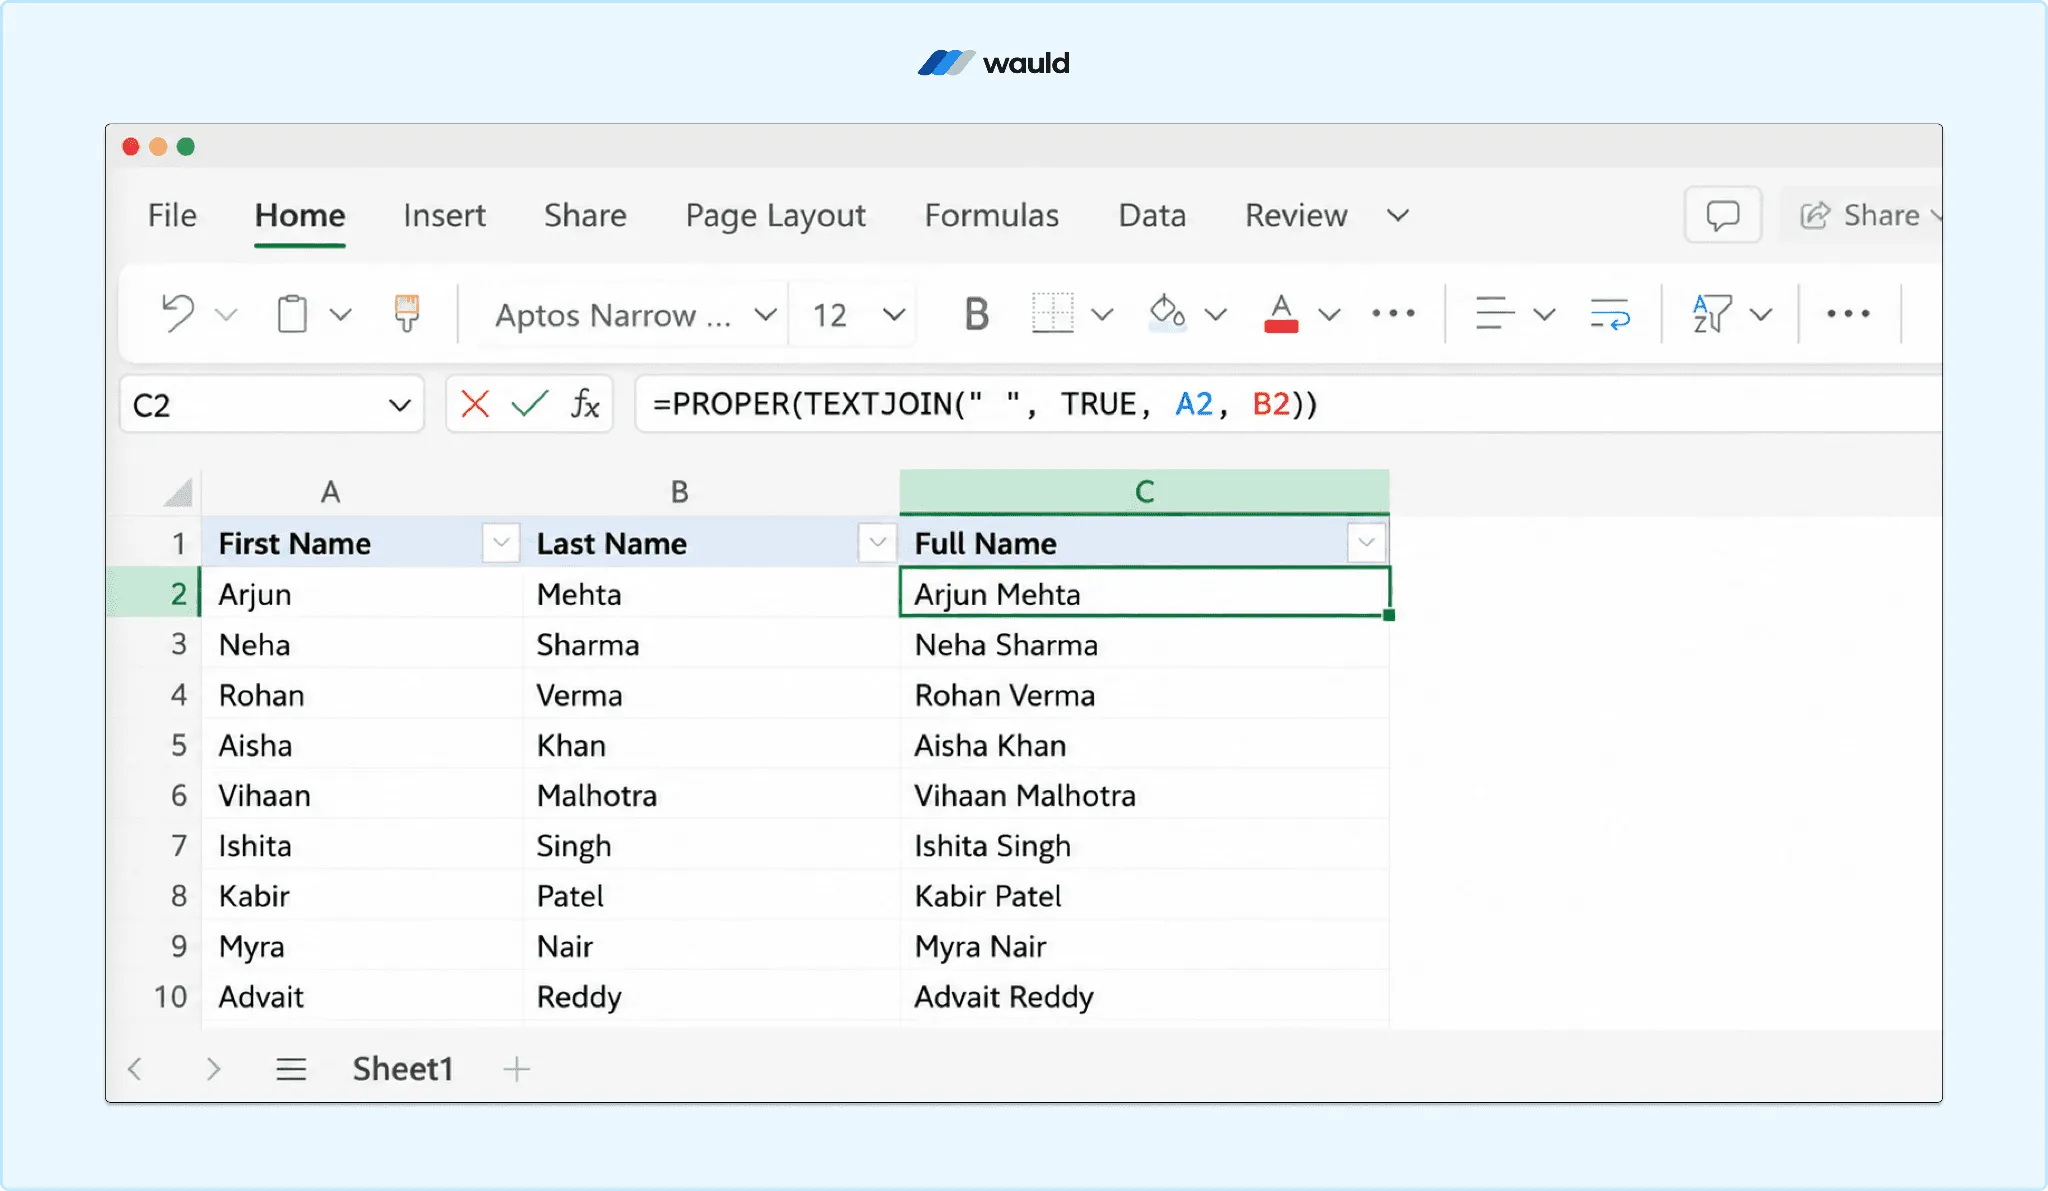
Using PROPER(TEXTJOIN()) to combine first and last names while automatically applying proper capitalization in Excel.
Converting Concatenation Formulas to Static Values
Once names are combined, lock them in as plain text values in Excel. This protects the result if you delete the original columns later.
Steps:
- Select the two cells, or the full combined name column.
- Copy it with Ctrl + C.
- Right-click and choose Paste Special, then Values Only.
Comparing All Seven Methods to Combine Names in Excel
| Method | Formula Based | Updates Automatically | Best For |
|---|---|---|---|
| Ampersand (&) | Yes | Yes | Quick one-off merges |
| CONCATENATE | Yes | Yes | Legacy Excel files |
| CONCAT | Yes | Yes | Modern Excel, simpler syntax |
| TEXTJOIN | Yes | Yes | Multiple name parts, blank cells |
| Flash Fill | No | No | Fast, one-time cleanup |
| Power Query | No, query based | Yes, on refresh | Recurring or large datasets |
| TRIM and PROPER | Yes | Yes | Cleaning messy imported names |
Whether you call it merging or combining, the outcome is one clean name column.
Common Mistakes When You Combine First and Last Name in Excel
These issues come up often with formulas, Flash Fill, and Power Query.
- Names stuck together with no space. Add the space delimiter to your formula.
- Formula shows an error. Check your cell reference for typos.
- Flash Fill will not trigger. Press Ctrl + E, or Cmd + E manually.
- Odd extra spaces. Wrap your formula in TRIM.
- Inconsistent capitalization. Wrap your formula in PROPER, or combine it with TRIM.
After Your Excel File Is Ready
Preparing your spreadsheet is only the first step. If you issue certificates for employees, students, or attendees, you must distribute them. Training participants often need the same treatment.
With Wauld, you can:
- Upload a CSV file in minutes
- Generate thousands of personalized certificates or badges
- Automatically populate names, dates, IDs, and other dynamic fields
- Add QR code verification
- Email credentials to recipients automatically
- Track opens, downloads, and shares from a single dashboard
Instead of creating certificates one by one, you can automate the entire issuance workflow. If your data lives in Microsoft Forms, see our Microsoft Forms certificate guide. Want to explore certificate design first? See our guide to online certificate makers. Issuing badges instead? Compare options in our roundup of top digital badge platforms.
Once you have prepared recipient names in Excel, the next step is issuing certificates. Wauld lets you upload your CSV and issue thousands of certificates in minutes.