


Key Takeaways
PowerPoint is a practical and powerful tool for certificate design
With clean layouts, clear text hierarchy, and simple design elements, PowerPoint allows anyone to create professional-looking certificates without advanced design software.Static PDF certificates limit scalability and trust
While PDFs are easy to export, they are difficult to verify, hard to manage at scale, and do not meet modern expectations for shareable, credible credentials.Wauld transforms PowerPoint designs into trusted digital credentials
By converting certificate templates into verifiable, shareable digital credentials, Wauld enables organizations to issue certificates confidently, reduce manual work, and build trust at scale.
Create a Certificate in PowerPoint and Wauld: A Quick Tutorial
A certificate might seem like a small thing, just a page, a PDF, a name and a date.
But for the person receiving it, it means much more.
It is proof of effort.
It is recognition.
And often, it is something they proudly share, whether on LinkedIn, in job applications, or with their peers.
That is why certificate design still matters. And in 2025 and 2026, it matters more than ever.
In this guide, we will walk through how to design professional certificates using PowerPoint, and then show how those designs can be turned into secure, verifiable digital credentials using Wauld, making them easy to issue, manage, and verify at scale.
Let us start at the beginning with a PowerPoint tutorial on creating certificates.
Why Certificate Design Still Matters (Even in a Digital World)
Even as credentials move online, first impressions still come from design.
A well-designed certificate:
Looks credible at first glance
Clearly communicates achievement
Encourages recipients to share it publicly
A poorly designed one can unintentionally reduce the value of the achievement, even if the learning itself was excellent.
This matters because digital credentials are increasingly visible in various certificate template designs.
78 percent of learners believe digital credentials improve their job prospects, and 96 percent say they are valuable for career growth, particularly when utilizing free certificate templates in PowerPoint.
When certificates are shared online, their visual clarity and structure become part of how skills are judged.
Good design is not decoration. It is trust.
Before You Start: What Every Certificate Design Should Include
Before opening PowerPoint, pause and ask one simple question.
What does this certificate need to clearly communicate?
Every effective certificate should include:
Recipient’s full name
What they are being recognized for
Issuing organization
Date of issuance
Signature or authority marker
These details are essential not just for readability, but also for digital verification, which is now a growing expectation across education, training, and hiring.
Why Using Microsoft PowerPoint Works So Well
You do not need advanced design software to create professional certificates.
PowerPoint works well because certificates need:
Clean layouts
Clear text hierarchy
Consistent spacing
Simple visual structure
Each slide acts like a blank canvas, giving you full control over alignment and visual balance, which is exactly what certificate design requires.
How to Make a Certificate in PowerPoint
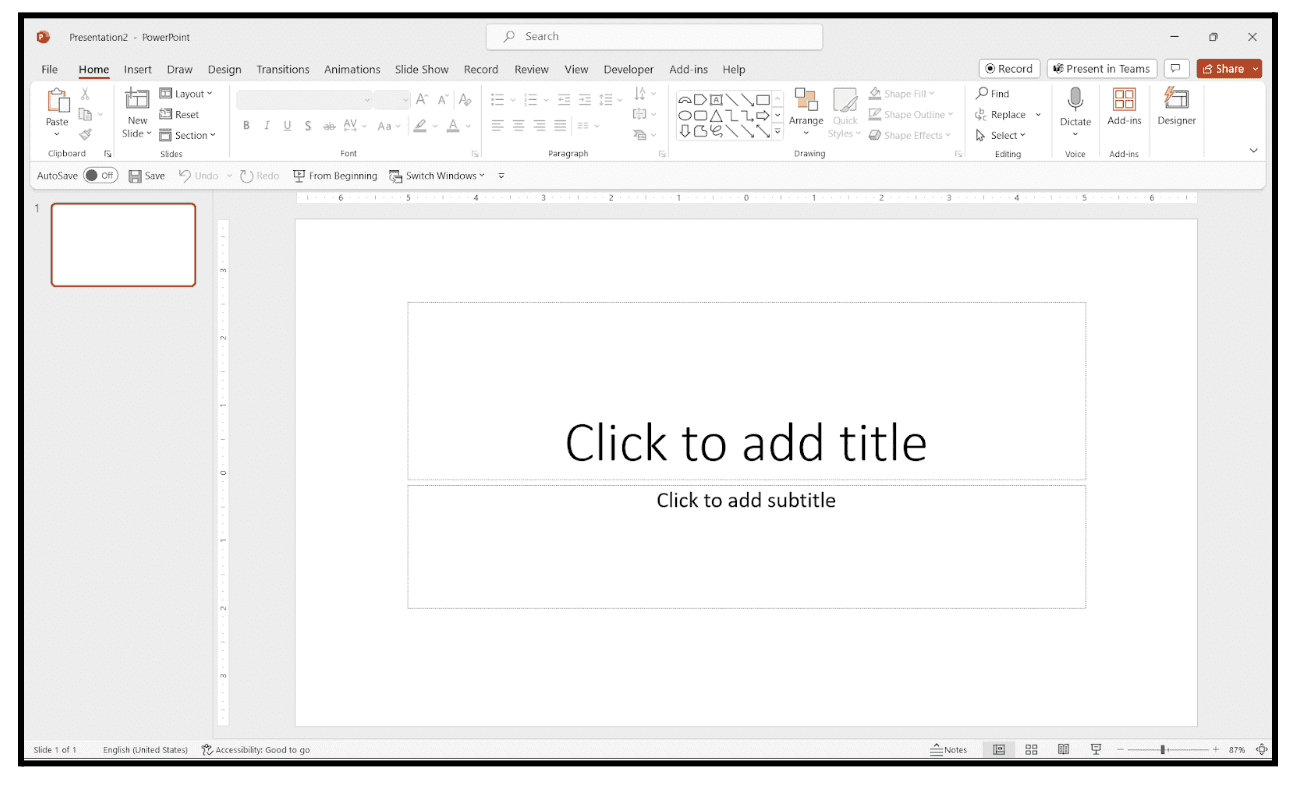
Step 1: Create a Blank PowerPoint Presentation
Open PowerPoint on your desktop or web app and select Blank Presentation.
A white slide will appear by default. This slide becomes your canvas to create a certificate from scratch.
On your screen:
The menu is at the top
Slide previews appear on the left
Theme suggestions may appear on the right, which you can close
Starting with a blank slide gives you full design control.
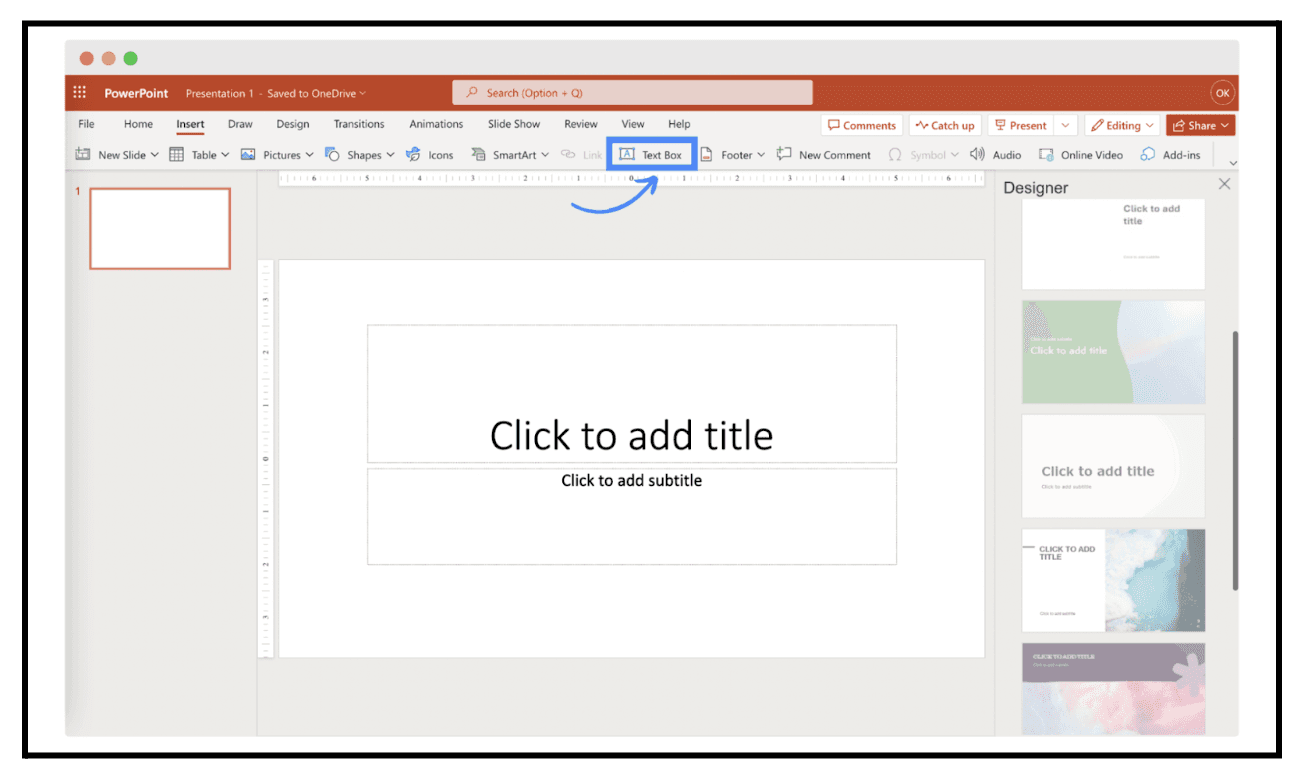
Step 2: Define and Add the Certificate Text
Now begin adding content.
You can use the default placeholders or insert your own text boxes.
To insert a new text box:
Go to Insert in the menu
Click Text Box
Draw the text box anywhere on the slide
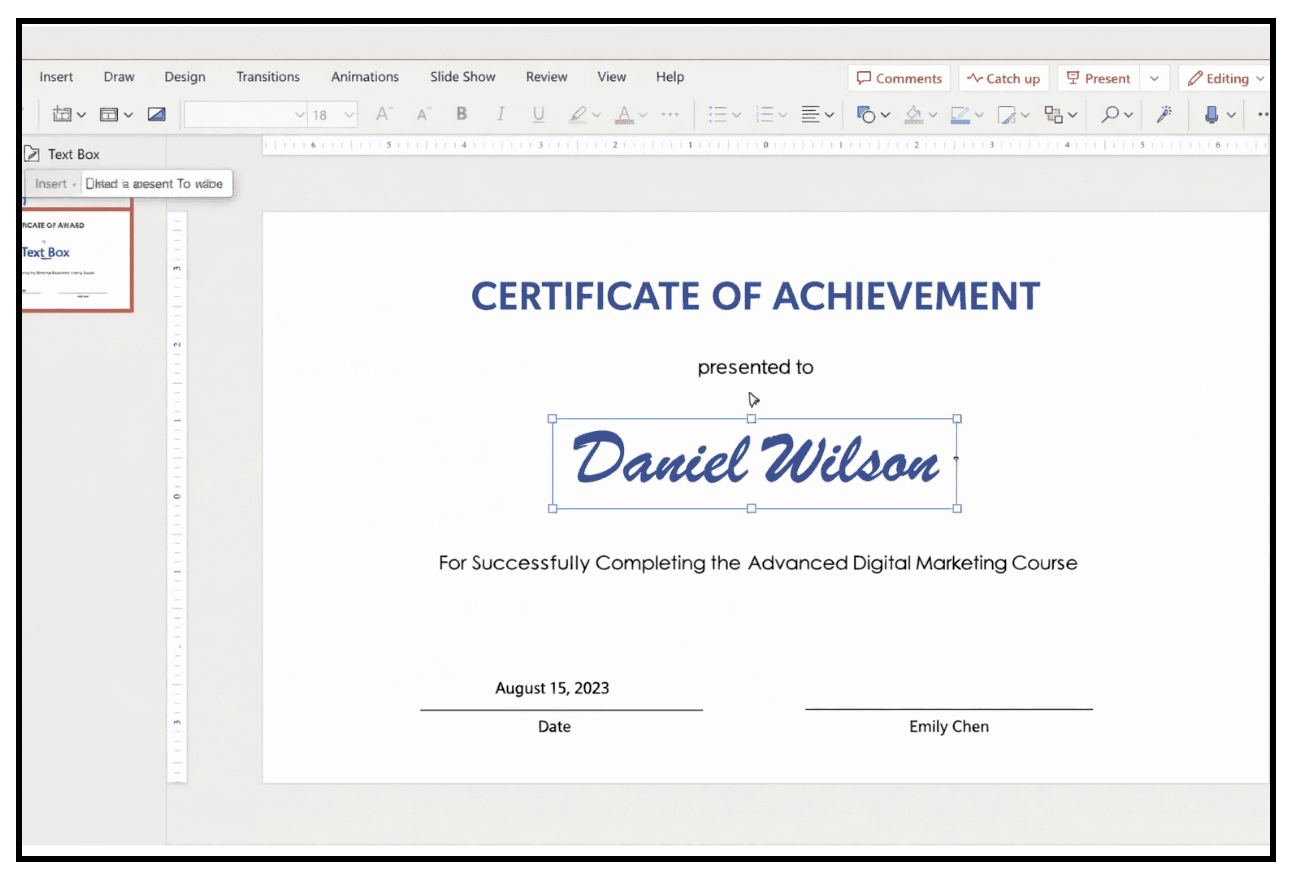
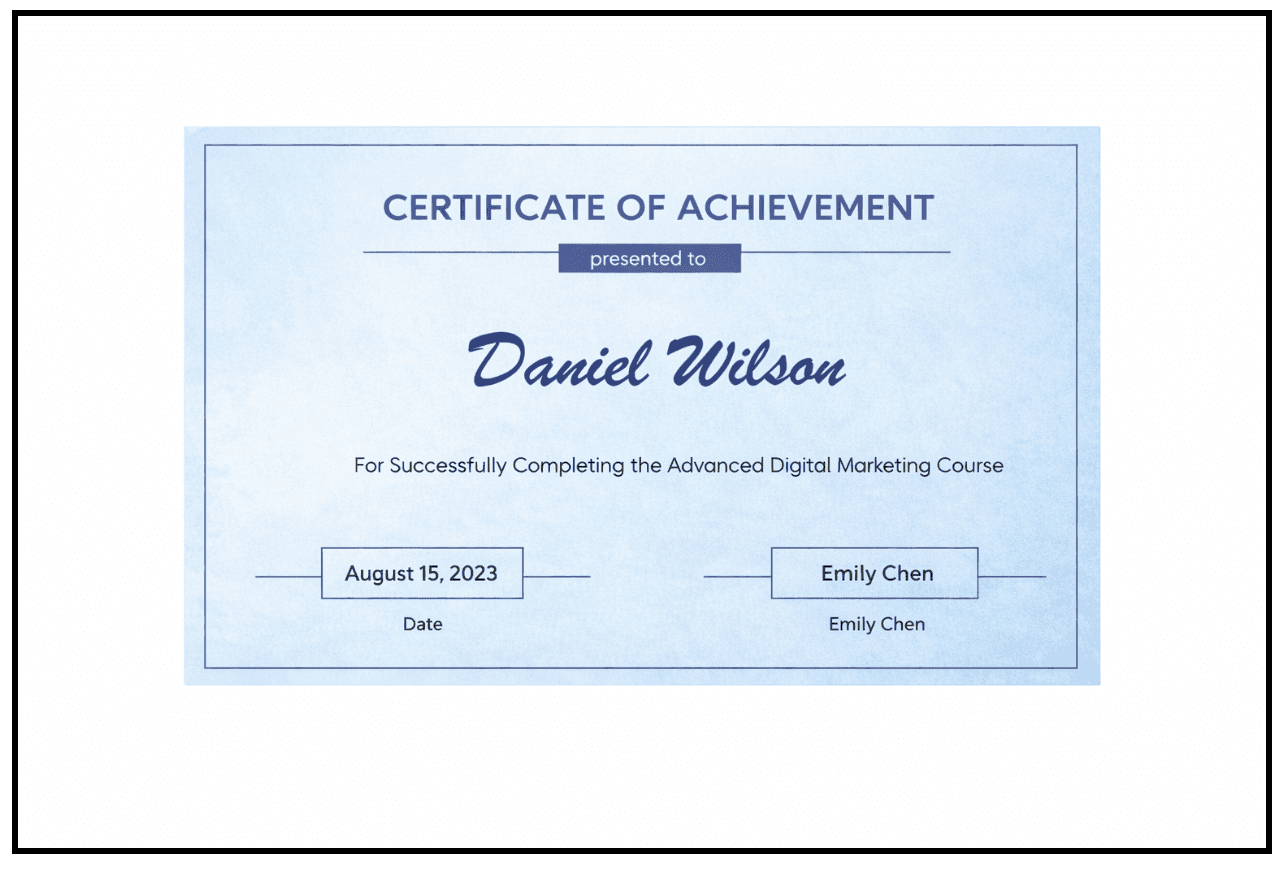
Add the following text elements:
Certificate title
Recipient’s name
Achievement or reason for recognition
Issuing organization
Date and signature line
Use one or two fonts only. Keep text away from slide edges to avoid printing issues.
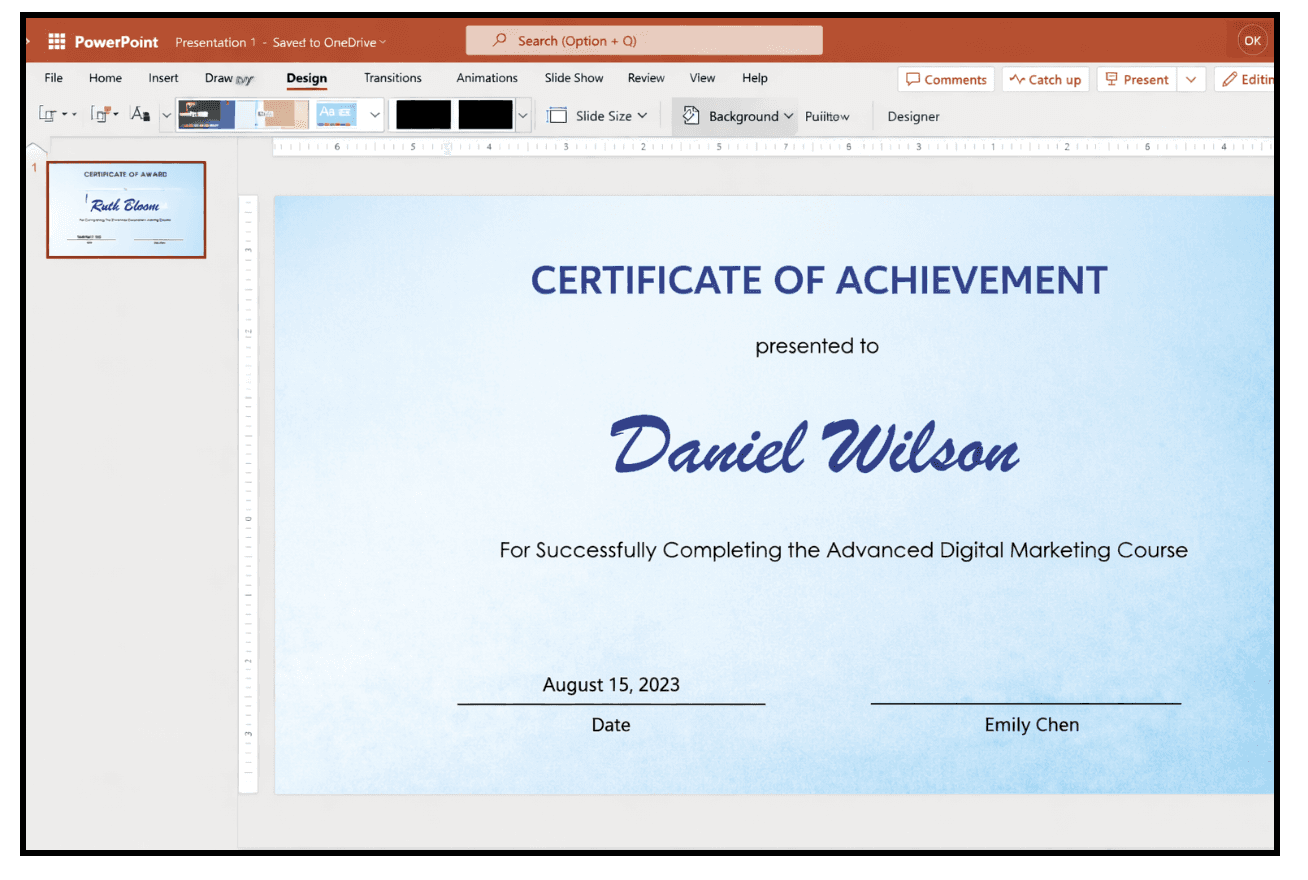
Step 3: Choose or Create Certificate Background using PowerPoint
You have two common options.
Option one: Solid color background
Go to Insert and select Shapes
Draw a rectangle covering the entire slide
Use Shape Fill to choose a color
Remove the outline
White or light backgrounds work best for formal certificates.
Option two: The image or graphic background can be customized using a PowerPoint template.
Insert a subtle background image
Make sure text remains readable
Avoid busy or high-contrast designs
Step 4: Include Elements using PowerPoint
Once the text and background are ready, enhance the design carefully.
You can add:
Thin borders
Accent rectangles under titles
Lines to separate sections
Use Insert, then Shapes, and style them using Shape Fill and Shape Outline.
Avoid overcrowding the design. Clean certificates look more professional.
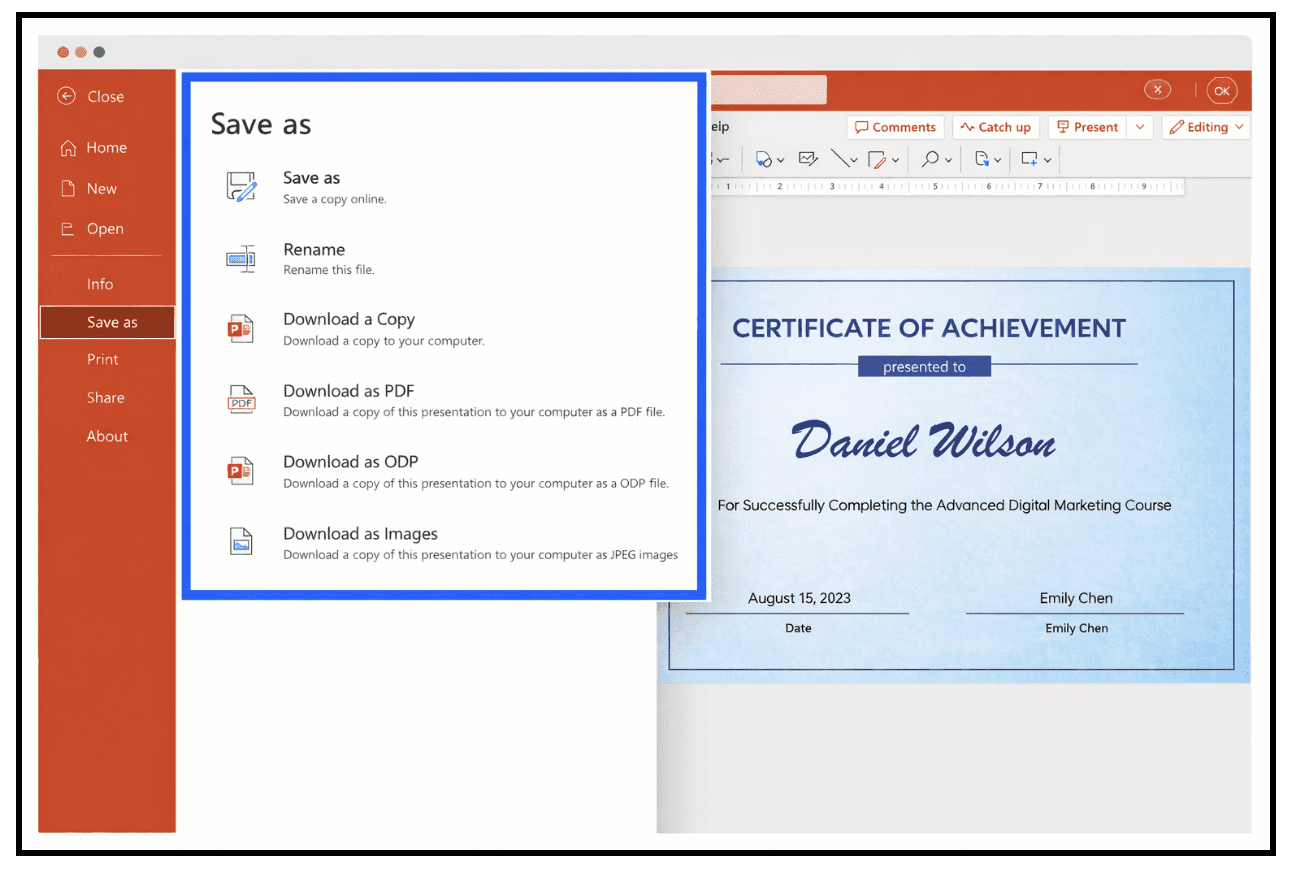
Step 5: Save and Export the Certificate Design
When your design is complete:
Save the editable PowerPoint file
Export the certificate as a PDF
PDF format preserves layout and fonts across devices.
At this stage, certificates usually need to be sent manually, which becomes time-consuming at scale.
This is where Wauld comes in.
Turning Your PowerPoint Certificate Template Into a Digital Credential With Wauld
Wauld is a digital credentialing platform that enables organizations to issue, manage, and verify digital certificates and badges with ease, including customizable certificate options.
Instead of stopping at a static PDF, Wauld helps you transform your PowerPoint certificate into a verifiable digital credential.
Below is the exact step-by-step flow.
Step 1: Set Up Your Organization in Wauld
Every account in Wauld starts with an Organization, which represents the official issuing authority.
For example:
Organization: XYZ
Under one organization, you can create multiple workspaces for different use cases.
Example:
Workspace: AI Workshop
Workspace: Internship Certificates
This structure keeps credentials organized while maintaining one verified identity.
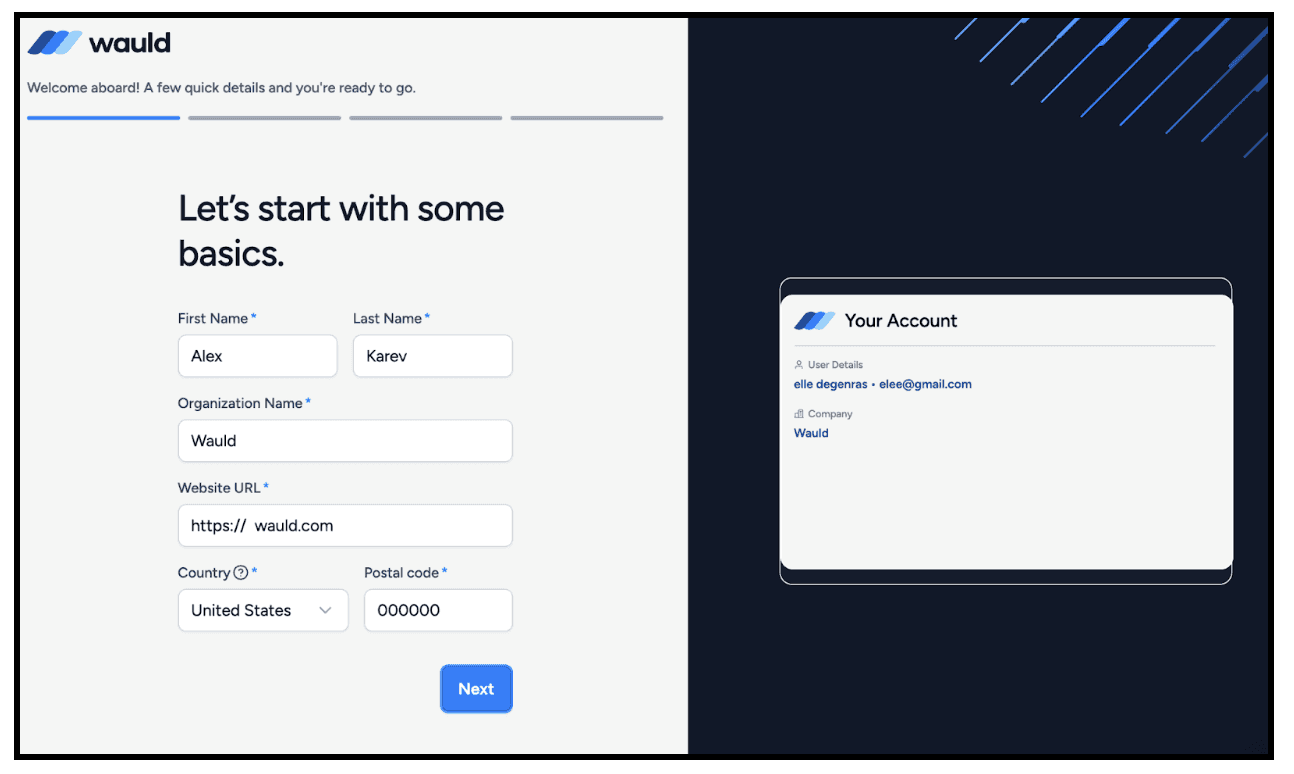
Step 2: Sign Up and Complete Organization Details
The onboarding process is simple.
You will:
Create an account using first name, last name, and email
Enter organization name, website, country, and postal code
Select your industry
Choose organization size
Specify the purpose of issuing credentials, such as course completion
Once done, you land on the dashboard.
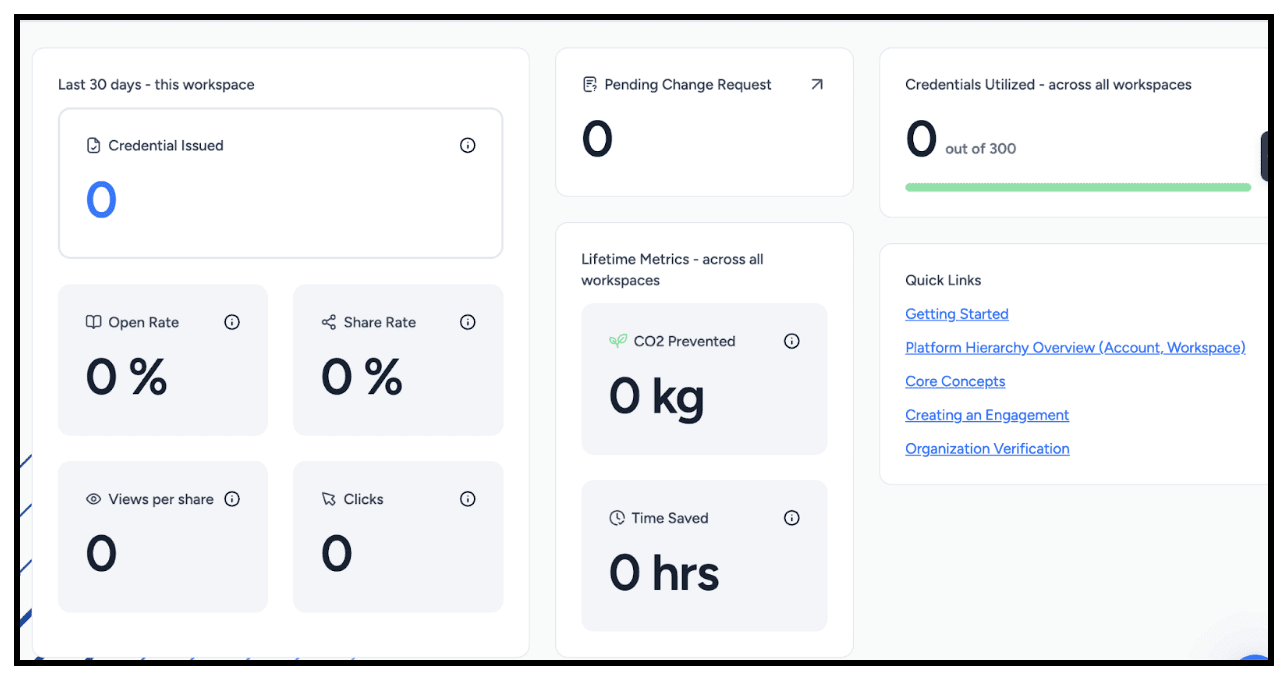
Step 3: Understand the Wauld Dashboard
The dashboard gives you a real-time overview of credential activity, including:
Total credentials issued
Pending change requests
Credentials utilized out of your quota
Open rate and share rate
Views per share and link clicks
CO₂ prevented by going digital
Estimated time saved compared to manual issuance
These insights help you understand both reach and impact.
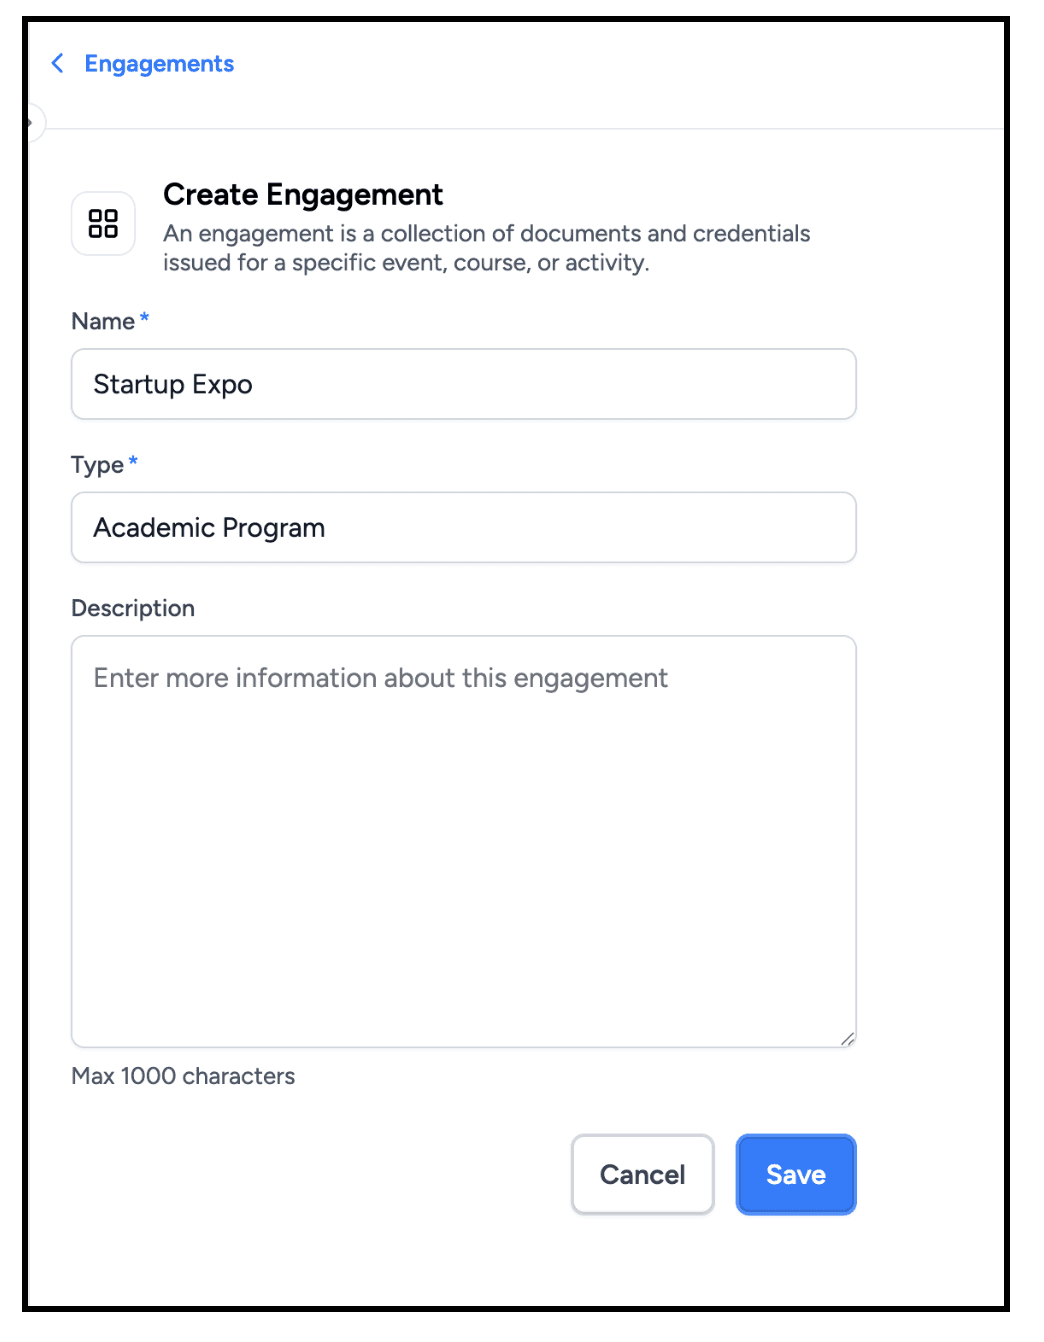
Step 4: Create an Engagement
An engagement represents a specific event, course, or program.
To create one:
Enter engagement name
Select type such as workshop, webinar, or competition
Add a short description
Each engagement keeps its certificates, recipients, and reports organized.
Step 5: Make a Certificate in Wauld Design Studio
Inside the engagement, click Create Document.
You will:
Choose Certificate or Badge
Name the document
Select recipient type, individual or group
Define recipient attributes like name, email, and date

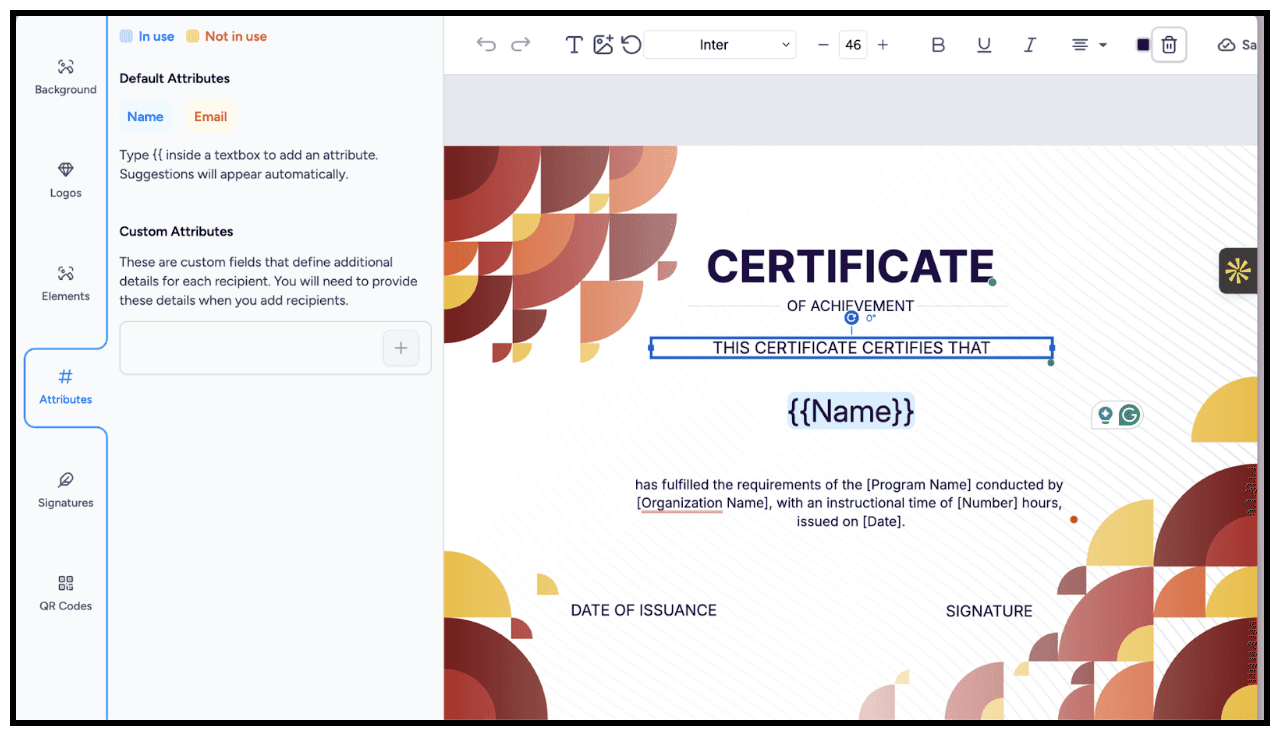
Then enter the Design Studio.
Here you can:
Start from a template or design from scratch
Add logos, brand colors, and signatures
Insert dynamic placeholders such as recipient name and completion date
Add backgrounds, borders, QR codes, or digital seals
Use alignment tools for clean layouts
Preview changes live
Save versions for reuse
Your PowerPoint design translates naturally here.
Step 6: Add Recipients
Next, add recipients:
Add individuals manually
Or upload recipients in bulk
Each recipient’s details automatically populate into the certificate design.
Step 7: Preview and Issue Credentials
Before sending, preview all credentials to confirm accuracy.
Choose how credentials are delivered:
Send via email
Download and send manually
You can allow recipients to:
Share credentials
Download verified PDFs
Add credentials to LinkedIn
You may also set an expiry date if required.
Before final issuance, confirm recipient consent.
Then click Yes, issue credentials now.
Wauld automatically sends personalized credentials to recipients.
What Happens After Issuance of the Digital Certificate
After issuance, both issuers and recipients benefit.
Issuers can:
View issued credentials
Download reports
Track engagement and verification
Recipients receive an email with access to their credential, where they can:
Share on LinkedIn, Twitter, or websites
Download a verified PDF with metadata
Scan QR codes for instant verification
Store credentials in their Wauld wallet
Final Thoughts
Designing certificates in PowerPoint is a strong starting point. With thoughtful layout and clean visuals, you create certificate styles that people are proud to receive.
But in a digital-first world, design alone is not enough.
The real value comes when certificates are:
Easy to verify
Simple to share
Trusted at scale
That is where digital credentialing completes the picture.
Ready to Turn Your PowerPoint Certificates Into Trusted Digital Credentials?
If you are already designing certificates in PowerPoint, you are halfway there.
With Wauld, you can turn those designs into secure, verifiable digital credentials that are easy to issue, manage, and share, whether you are working with 10 recipients or 10,000.
Design beautifully. Issue confidently. Build trust at scale.
Frequently Asked Questions on PowerPoint Certificate Design and Digital Credentials
Get answers to common questions about creating certificates in PowerPoint and issuing verifiable digital credentials with Wauld.


