


Key Takeaways
Design That Drives Growth: Learn why a certificate is not just a visual reward but a strategic marketing tool that builds trust and amplifies your brand.
Turning Certificates into Brand Assets: Discover how to create verifiable, shareable credentials that boost course completion and social visibility.
Smart UI and UX Decisions: Understand how to design certificates that are mobile-optimized, accessible, and instantly verifiable.
The Power of Data and Automation: See how dynamic data, metadata, and automation through Wauld transform manual certificate design into a high-impact workflow.
Security that Builds Credibility: Learn how cryptographic QR codes and verifiable pages prevent fraud and enhance trust.
Consistent Branding at Scale: Explore how to lock in logos, color palettes, and templates to maintain design precision across thousands of certificates.
Built for Sharing, Designed for ROI: Find out how optimized titles, celebratory delivery emails, and one-click sharing turn every credential into free brand promotion.
Measure What Matters: Track engagement metrics like social share rates and verification clicks to prove the ROI of every certificate you issue.
“Design is not just what it looks like and feels like. Design is how it works.” – Steve Jobs.
That quote gets straight to the point. For online coaches and course sellers, your course completion certificate is not just a pretty picture you make with a tool like How to design a certificate in Photoshop. It is a tool.
If it does not work correctly, it is useless. A certificate should demonstrate skills, build trust, and bring more customers to your business. Most people only ask how to design a certificate, but they miss the real, technical aspects that make a certificate truly professional.
In this guide, we will highlight the smart, data-driven steps you must take to design a certificate that works.
This is about security, automation, and turning a final document into a free, powerful marketing tool that scales with your growth.
We will also discuss how to move past basic programs, such as designing a certificate in Word or PowerPoint, and use a system that builds your brand's authority and proves your students' success.
The Strategic Shift: How to Design a Certificate In Minutes
Your certificate is your brand's last touchpoint and a powerful marketing asset. When a student shares their credential on LinkedIn, that single post acts as a high-trust testimonial.

A. Define the Asset: Beyond a Simple Document
Treat the certificate as a verifiable, mobile-optimized microasset rather than a final document. It is important to create a resource that students look forward to sharing. This means prioritizing clarity and verifiable security over complex graphics. Whether you design a simple certificate of appreciation or a complex certificate, the fundamental rules of data and security apply equally.
B. The Business Case for Design Precision
Poor, inconsistent design signals low quality in your course program. Professional design, executed efficiently via a platform like the Wauld Dashboard, directly translates into higher perceived value.
This strategic use of credentials is not theoretical; programs that successfully issue digital credentials see significant results. For example, digital credential programs have increased course completion rates by up to 694%.
This is why your first step is asking the strategic question, not how to design an award certificate aesthetically, but how do I design a verifiable asset at scale?
Technical Specs: Optimizing How to Design a Certificate for UI/UX & Conversion
To find answers to how to design a certificate in Publisher or any other tool, you must think about how the final image is read by a person and by a machine.
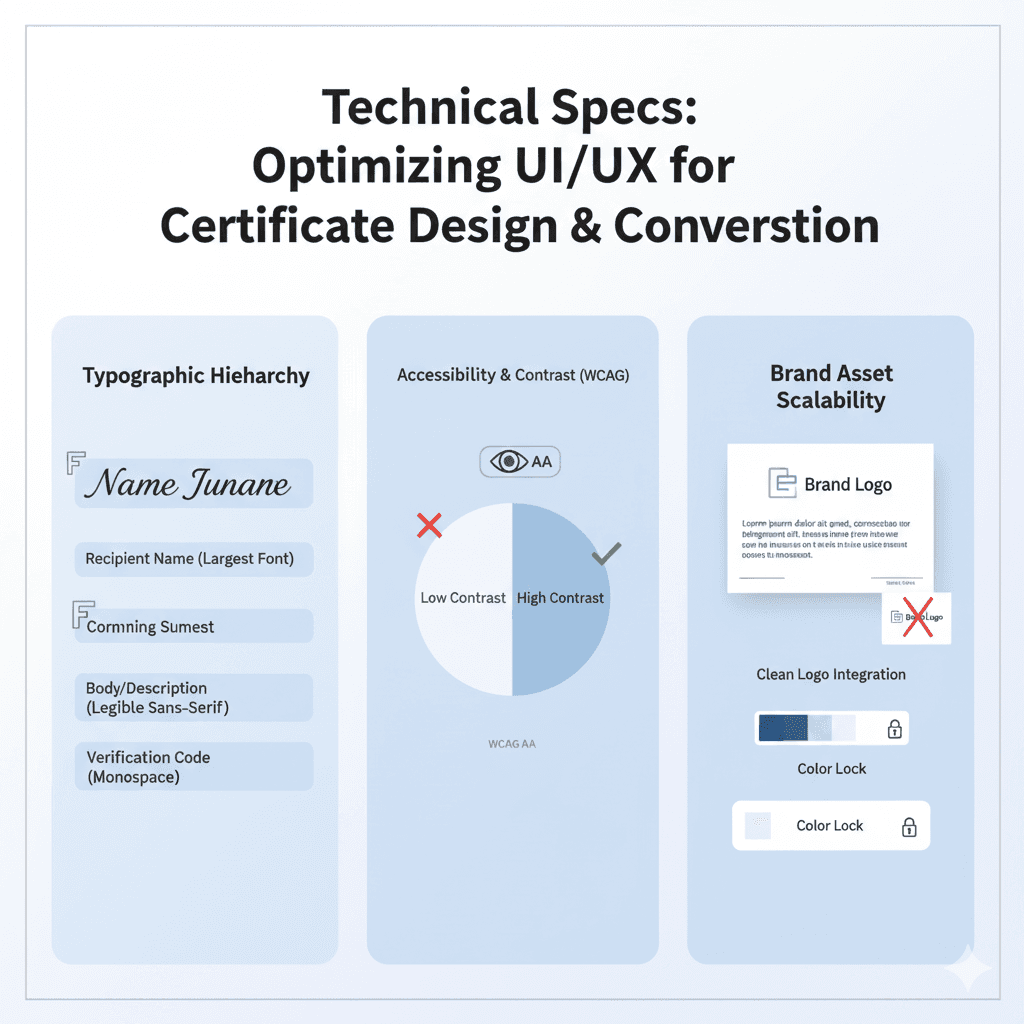
A. Typographic Hierarchy for Designing a Certificate of Achievement
The human eye follows the F-pattern when viewing documents. Your design must strategically draw the eye to the four critical fields: Recipient Name, Achievement, Issuer (Brand), and the Verification QR Code. Therefore, if we answer questions like how to design a certificate of achievement, it means mastering visual flow.
Element | Font Type Recommendation | Strategic Purpose |
Recipient Name | Serif or Script (Largest Font Size) | Emotional impact and primary focus. |
Body/Description | Sans-Serif (Standard Font Size) | Maximum legibility on mobile and desktop. |
Verification Code | Monospace or Sans-Serif (Smallest Font Size) | Clear, functional, technical readability. |
B. Mandatory Contrast and Accessibility (WCAG)
Your color scheme is critical. You must ensure high color contrast ratios, adhering to WCAG 2.1 Level AA standards. This is a technical rule, not a suggestion. High contrast makes the certificate universally accessible and machine-readable. A readable certificate is a shareable certificate.
C. Brand Asset Scalability & Security
When learning how to design a border for a certificate or even placing your brand logo, think about consistency across thousands of certificates.
Logo Integration: Use only high-resolution PNG files with a transparent background. This ensures your logo sits cleanly on any background without the ugly white box, a common mistake when manually working with tools like those for how to design a certificate in Illustrator or how to design a certificate in InDesign.
Color Lock: Try to restrict your palette to 2-3 core brand colors. This prevents color creep and ensures brand recognition.
You don't need to verify every design manually with Wauld. Our robust dashboard allows you to lock in approved hex codes, logo positioning, and signature images.
It also ensures perfect brand consistency when bulk issuing credentials. As a result, the tool eliminates the tedious, error-prone process of figuring out how to design certificates in CorelDRAW for every batch you create.
You can even explore our tips for 15 Ready-to-Use AI Certificate Templates That Inspire Pride for fast inspiration.
The Data Layer: Security, Verification, and Brand Amplification
The core of a professional certificate is not its visual design; it is its data and security layer. This is the difference between a high-value asset and a meaningless image.
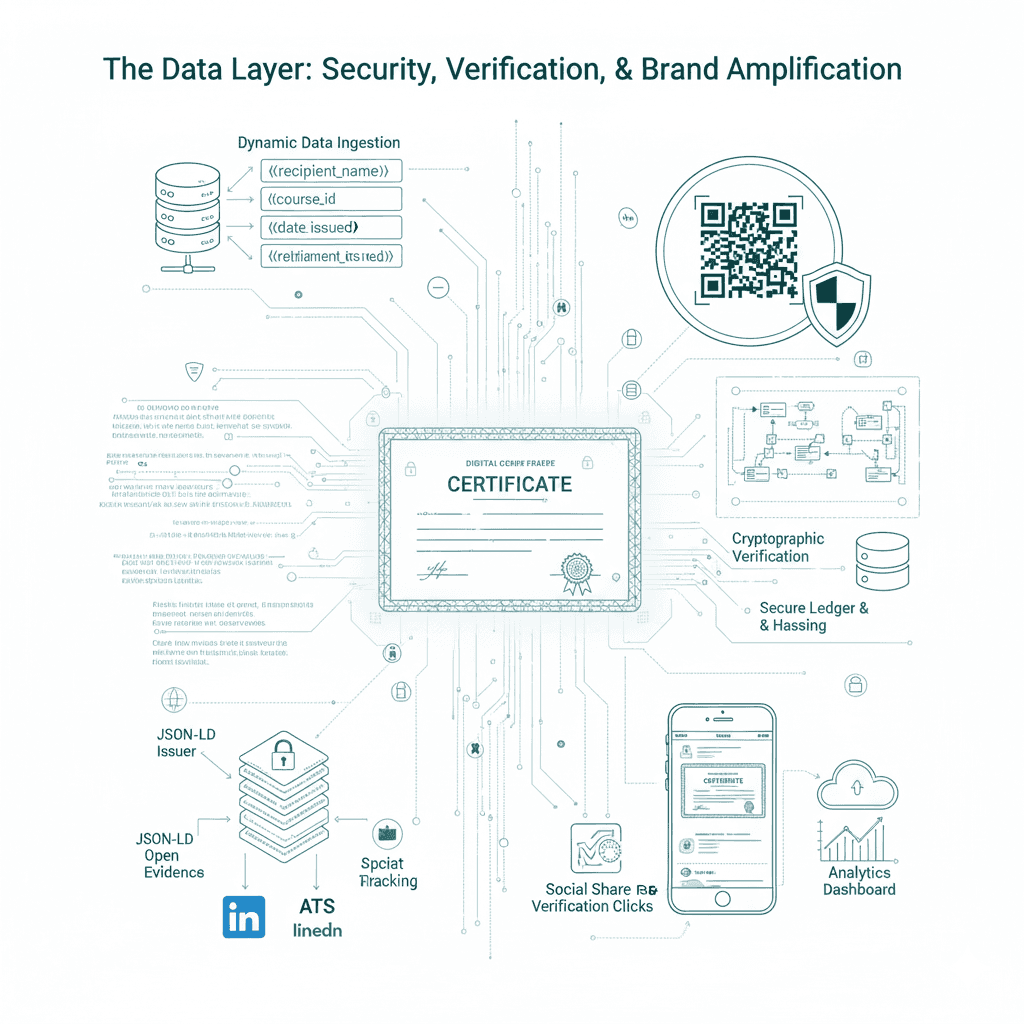
A. Dynamic Data: The Engine for How to Design a Certificate of Achievement
To scale, you must use dynamic attributes. You cannot manually enter a student’s name, course, and date for hundreds of people.
Field Type | Dynamic Attribute | Purpose |
Recipient | {{Recipient_Name}} | Primary personalization field. |
Achievement | {{Course_Name}}, {{Pass_Score}} | Proof of learning, links to course metadata. |
Security | {{Unique_ID}}, {{Date_Issued}} | Non-tamperable verification and audit trail. |
Zero-Touch Scaling: Wauld's API or simple CSV upload maps your bulk student data directly to these placeholders. If you are still using old tools and trying to figure out how to design a certificate in Photoshop CC, you are missing the biggest opportunity for automation.
We make it easy. Design your custom certificate once, upload it to Wauld as your base template, and transform it into a smart, data-fueled asset ready for bulk issuance.
B. Cryptographic Verification (QR Code)
The technical requirement that makes your certificate work is the secure element. Every professional credential needs a unique, non-tamperable QR Code that links to a secure, public Wauld Verification Page.
Fraud Prevention: This is your fraud protection layer. Anyone viewing the certificate can scan the code to instantly verify that the credential is real and that the details match your secure database.
Instant Credibility: The QR code delivers proof of achievement in less than one second, eliminating skepticism from hiring managers.
Tamper-Proof Ledger: Each verification check is logged and secured on a blockchain-like ledger, ensuring data integrity that manual certificates cannot match.
Proof Point: This verification detail is critical. It makes your digital credentials far more powerful than traditional paper, giving stakeholders complete context about the achievement.
For a course on advanced skills, your certificate should act as a high-trust credential. You must design for the future, like the Timeless Graduation Certificates That Leave a Legacy.
Additionally, you can use your existing tools, even if you are an expert and know how to design a certificate in Photoshop CS6, but you must use a platform to make it verifiable.
C. Metadata & Open Badges Standards
Your certificate is more than just an image file. It must have rich, embedded metadata (Issuer, Criteria, Evidence). Adherence to Open Badges 2.0/3.0 specifications ensures cross-platform portability and machine readability by applicant tracking systems (ATS).
This rich data structure ensures your beautiful design is fully recognized and used by your students' potential employers. The digital badges market is projected to register a CAGR of 20.2% between 2024 and 2032, proving that it is a high-growth and essential market asset.
Content & Messaging Strategy: The Viral Credential
A perfectly designed and verifiable certificate is only half the battle. You must give your students the exact messaging they need to turn their achievement into a viral marketing asset for your course. This is where your strategy moves from technical design specs to copy strategy.
A. The Certificate Naming Architecture
The title is the core text for the student's LinkedIn profile. Do not use vague titles; instead, use language that highlights a valuable, job-ready skill. This choice impacts how future employers search for and find your credentials.
Title Strategy | Example Title | Strategic Impact & Use Case |
Formal/Traditional | Certificate of Completion | Use Case: Internal HR files, academic records. Impact: High precision, but low SEO value on social media. |
Actionable/SEO | Certified [Your Brand] Digital Marketing Expert | Use Case: LinkedIn profile, resume, skill section. Impact: High SEO, clearly communicates a marketable skill. |
Specific/Value-Driven | Professional Credential in Leadership Strategy | Use Case: Direct appeal to recruiters searching for specific skills. Impact: Drives higher professional visibility for your student and brand. |
Lastly, remember that a single piece of text directly influences whether a student adds the credential to their LinkedIn profile and CV.
For a visual example of how this high-impact naming is applied in our designs, see the template preview below from the Wauld Dashboard.
//*Here, you can insert an image placeholder of a high-impact certificate from the Wauld Dashboard, visually showing a "Certificate of Appreciation/completion" in use.*//
B. The High-Conversion Email Delivery: Strategy & Verification
The delivery email is your final chance to drive a critical action: sharing. The email must be short, highly celebratory, and include a clear Call-to-Action (CTA). Your email strategy is crucial for linking the credential to your brand's authority.
Email Element | Strategic Messaging | Goal |
Subject Line | "Your New Professional Credential Has Arrived!" | High open rate; signals immediate value. |
Body Copy | Use excited, confident language; Add a prominent, personalized verification link. | Validates the student's effort and provides instant proof of authenticity. |
CTA Button | Add to LinkedIn Profile (Not "Download Here") | Drives social sharing; generates free brand awareness. |
A Pro Tip: Every email must include the unique, verifiable URL for the certificate. This link should be prominent, allowing the student to instantly prove their achievement without having to download or upload anything first.
C. Technical Design for Social Sharing
Your certificate is a social asset. Its design and metadata need to be optimized for the specific platforms where students will use it.
Platform | Technical Requirement | Strategic Benefit |
LinkedIn Image | 1.91:1 aspect ratio (optimal for feed display). | Prevents image cropping; ensures logo and name are visible, maximizing brand exposure. |
Facebook/Web | Open Graph (OG) Tags in the verification page metadata. | Controls the image, title, and description that appear when the certificate URL is shared. |
Issuance Platform | One-Click Share Functionality. | Eliminates friction (download/upload); increases social share rate and conversion. |
A Pro Tip: Flawless technical execution paired with a sharp messaging strategy transforms every issued certificate into a powerful, automated, viral marketing asset. This is how you win in the digital learning space.
Scaling Issuance Using Wauld: How to Make Certificate Design Work at Volume
If you are a business owner, your time is your most valuable asset. Stop wasting it on repetitive work that a machine can do faster and with zero errors. This is the simple case for moving past manual methods for how to design a certificate in Microsoft Word and toward automation.
You have perfected the design; now, you must scale the delivery. Manual tools cannot handle the volume, personalization, or required verification layer. We replace hours of tedious work with a simple, high-velocity process in the Wauld Dashboard, giving you visually appealing certificates.
This is the exact way to issue thousands of personalized certificates. You can use a simple drag-and-drop dashboard with no risk.
The Wauld 3-Click Issuance
Step | Action in Wauld Dashboard | Value & Automation Driver |
Data Ingestion | Navigate to "Issuance" > Upload the CSV file with student data. Map CSV columns to template placeholders. | Automated Data Mapping: Wauld instantly run a data integrity check and map thousands of data points for rapid, error-free bulk certificate design. |
Review & Confirmation | Access the "Review" screen. View the pre-issuance batch preview and confirm email subject lines. | Zero-Risk Issuance: Visually confirm every certificate of achievement looks perfect before deployment, eliminating data errors and protecting brand quality. |
Deployment & Tracking | Click "Send Batch." Wauld distributes the personalized, verifiable certificates. | Measurable ROI: Wauld deploys the assets and immediately begins tracking key marketing metrics like Social Share Rate and Acceptance Rate for true performance measurement. |
Now, this process is the most efficient method for how to design a certificate online and distributing it at scale.
You can even use simple tools to Generate Certificates and Badges with Google Forms for Your Events, Webinars, or Courses to feed your data directly to Wauld.
The ROI Matrix: Automation vs. Manual Labor
If your business is built for growth, you cannot afford the limitations of manual tools. When you decide to design a certificate using MS Word or any other traditional tools, you choose a design-first tool. Similarly, when you choose Wauld, you choose a data-first platform. Here’s how:

Comparison: Wauld’s Certificate maker vs. Manual Tools for Bulk Issuance
Technical Feature | Manual Tools (CorelDraw, MS Word, Photoshop) | Wauld Dashboard (Issuance Platform) |
Bulk Issuance Protocol | Manual Mail Merge: High latency, sequential processing, manual output file management. | Automated Batch Processing with Beautiful Certificates: Low-latency, parallel data mapping via API/CSV, zero-touch file generation. |
Verification Security | Zero/Static Security: No built-in verification; reliance on non-secure PDF/image files. | Cryptographic Security: Unique, non-tamperable QR code linked to a secure blockchain-like verification ledger. |
Data Structuring | Static Data: Limited to flat text fields; non-compliant with global data standards. | Dynamic Metadata: Full Open Badges 2.0/3.0 compliance for machine readability by ATS and professional networks. |
Asset Scalability | Resolution-Dependent: Design resolution limits output size; file format conversion errors are common. | Cloud-Based Vector Rendering: High-fidelity output (PDF/PNG) regardless of batch size; guaranteed brand consistency via the Brand Kit. |
Recipient Analytics | No Reporting: Zero insight into recipient engagement or credential utilization. | Real-Time Reporting: Tracks Acceptance Rate, Social Share Rate, and Verification Clicks for precise ROI calculation. |
User Experience | High Friction: Requires multiple software licenses, file uploads, and manual email distribution. | Low Friction: Single-dashboard control, integrated email delivery, and one-click sharing for high user adoption. |
Conclusion: How to Design a Certificate That Works
A great certificate is not defined by how it looks but by how it performs. When you combine design precision, data security, and automation, you move beyond aesthetics and create a system that scales with your growth.
This guide on how to design a certificate that works shows that the real power lies in verification, shareability, and measurable results. Every certificate you issue should build trust, drive visibility, and reflect your brand’s credibility.
With Wauld, you can turn every credential into a high-performing marketing asset that delivers value long after the course ends. Sign up today and start designing certificates that truly work for your learners and your brand.


