How to Add a Badge to LinkedIn: A Step-by-Step Guide

You finished the course, the badge landed in your inbox, and now it is sitting in a downloads folder doing nothing. Getting it onto LinkedIn takes about two minutes, and it is the difference between an achievement only you know about and one that shows up every time a recruiter opens your profile.
This guide covers the whole thing: what to collect first, the one-click route if your issuer supports it, the manual route if it does not, and how to announce the badge without sounding like a press release.
What to gather before you start
Every route below asks for the same handful of details, so open your credential page and copy them out first. Getting these right is what makes the entry verifiable rather than decorative.
- Badge name. The exact official title, not your paraphrase of it.
- Issuing organization. The full name, matching the issuer's LinkedIn page so the logo appears next to your entry.
- Issue date. Month and year. Add an expiry date only if the credential genuinely expires.
- Credential ID. The unique reference your issuer assigned, if there is one.
- Credential URL. The public verification link. This is the field people most often leave blank, and it is the one that turns a claim into proof.
- Two to four skills the badge represents, so you can mirror them in your Skills section.
Route 1: The One-Click "Add to LinkedIn" Button
If your badge came from a credentialing platform, start on the credential page rather than on LinkedIn. Look for a Credential Actions panel: on a Wauld credential it sits under the Verify and Download buttons, and the second entry is Add to LinkedIn Profile.
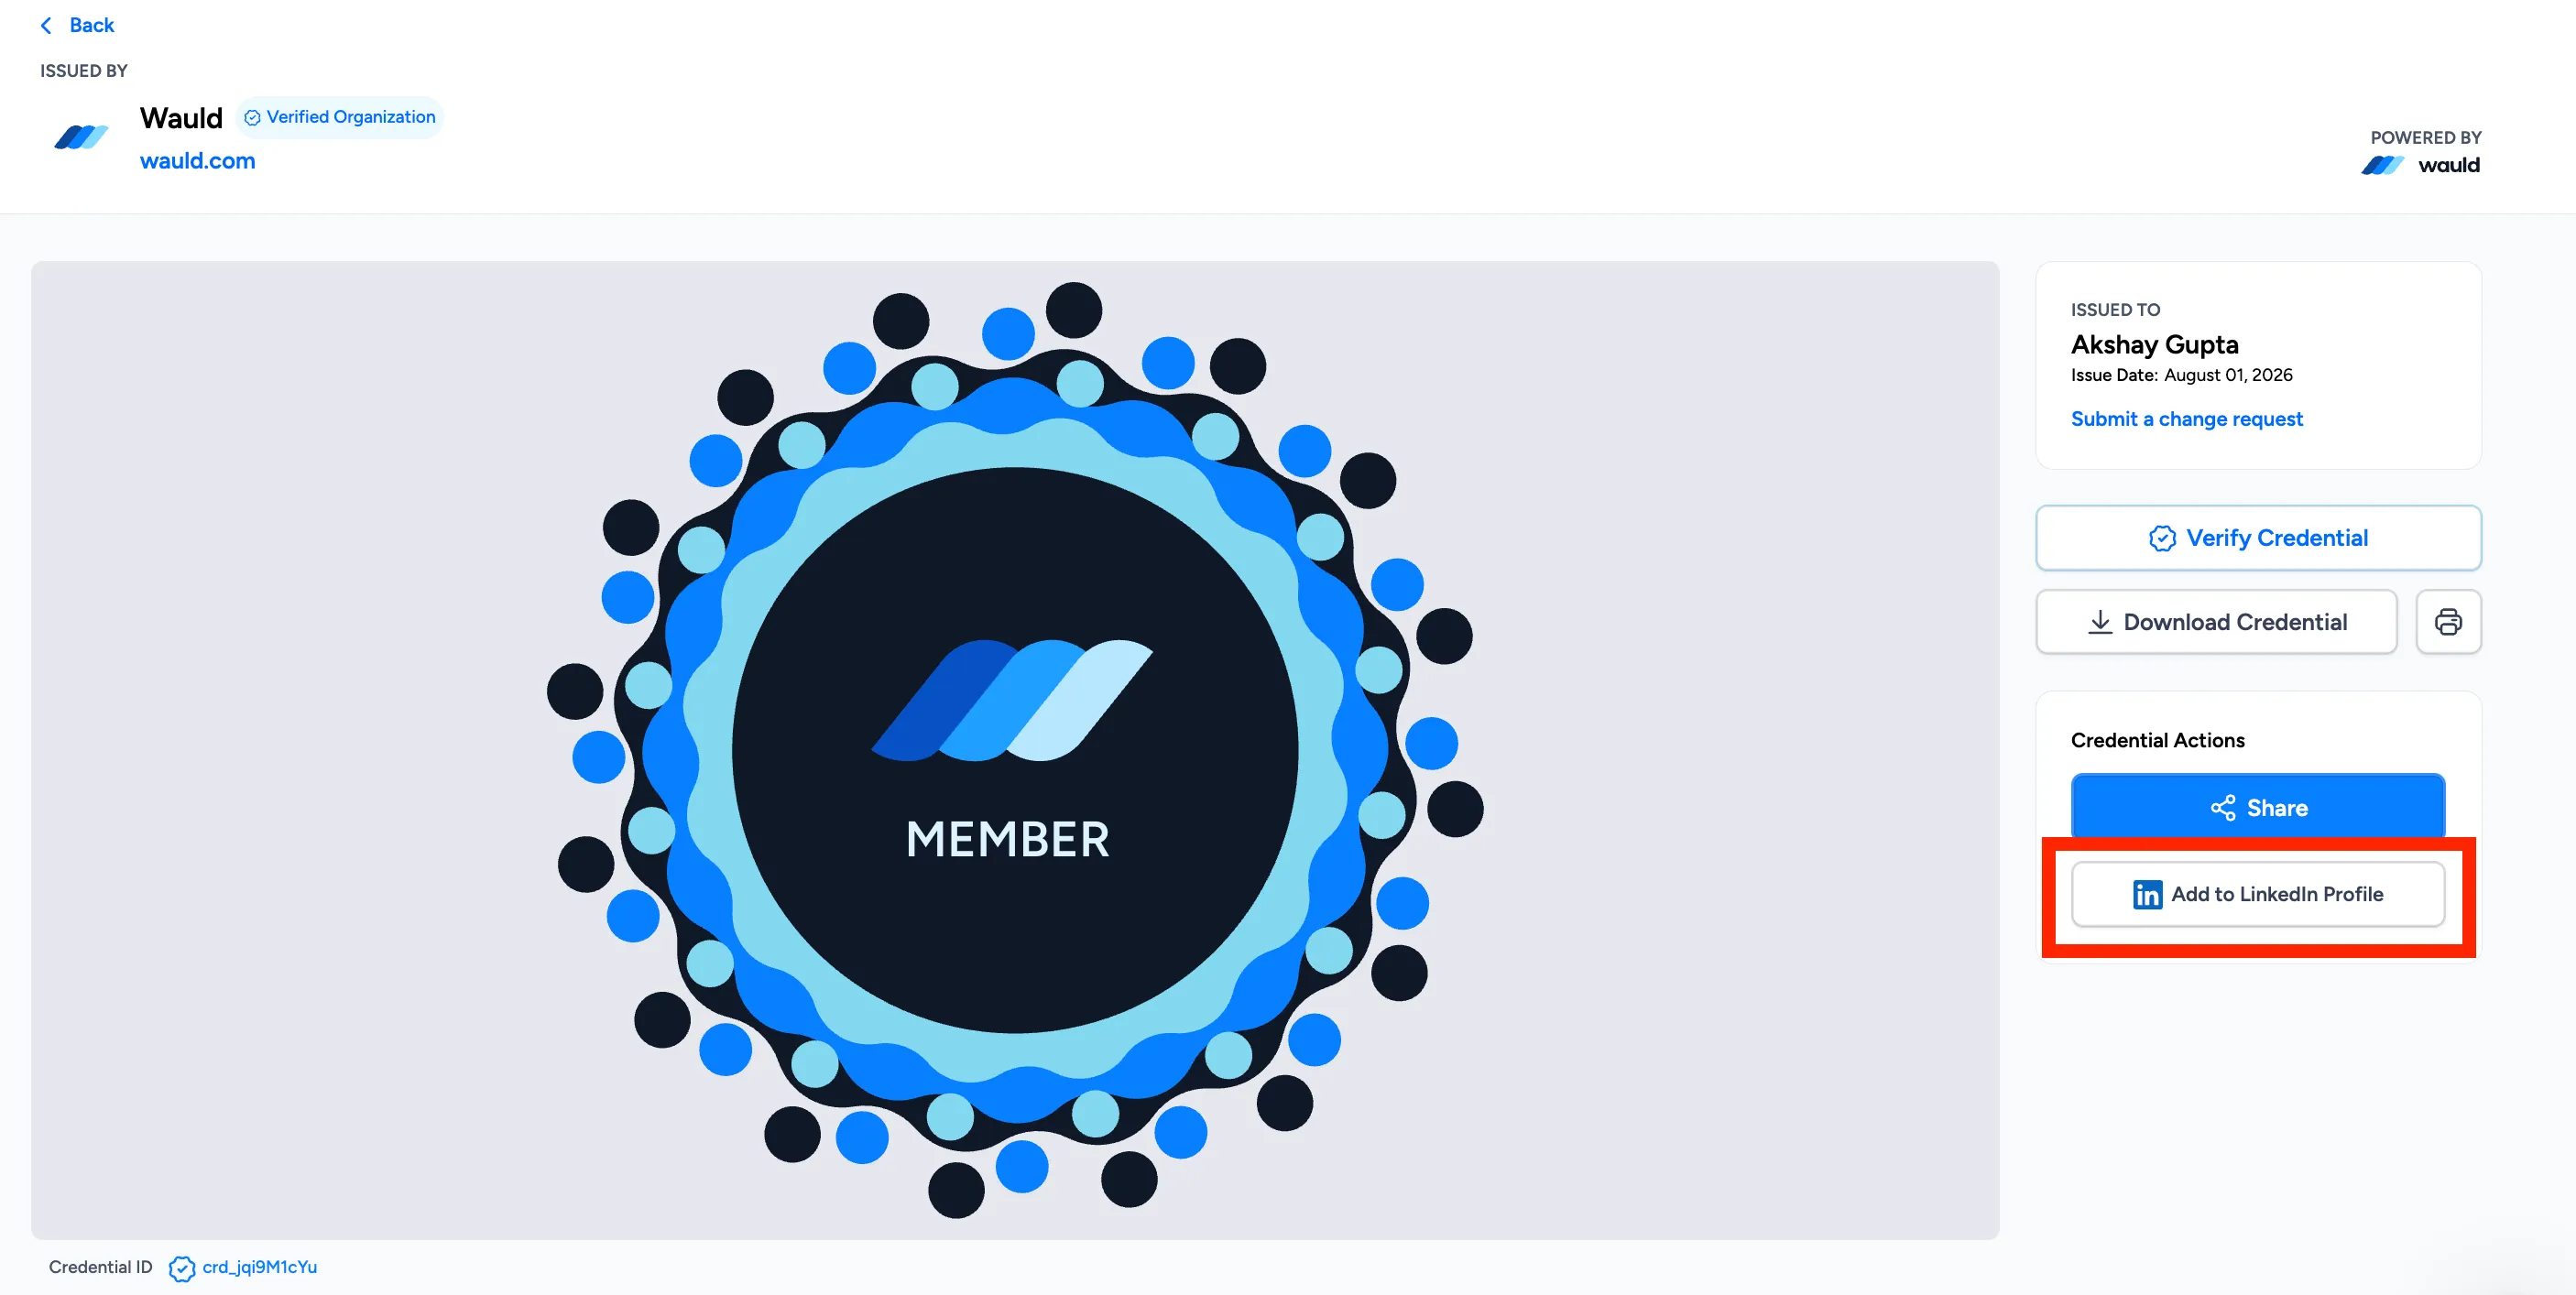
Behind that button is LinkedIn's "Add to Profile" flow. The issuer passes the name, organization, issue date, credential ID, and verification URL across as part of the link, so LinkedIn opens its certification dialog already filled in. Here is the whole thing end to end:
- 1
Open the credential page
Use the link from the email your issuer sent, or open the badge from your credential wallet.
- 2
Click "Add to LinkedIn Profile"
You will be asked to sign in to LinkedIn if you are not already. The certification dialog opens on top of your profile with the fields populated.
- 3
Add a skill, then save
Notice what the clip does not fill in: the Skills section. That is the one piece the issuer cannot supply for you, and it is the piece that feeds your Skills section, so add at least one before you hit Save.
Prefill is not the same as correct, so give it a glance before saving. Check that the issue date matches and that the issuing organization resolved to the real company page rather than plain text. Beyond that, this route takes seconds and removes any chance of a typo in the verification URL.
Route 2: Adding the Badge by Hand
No button? The manual path takes a couple of minutes and produces exactly the same result.
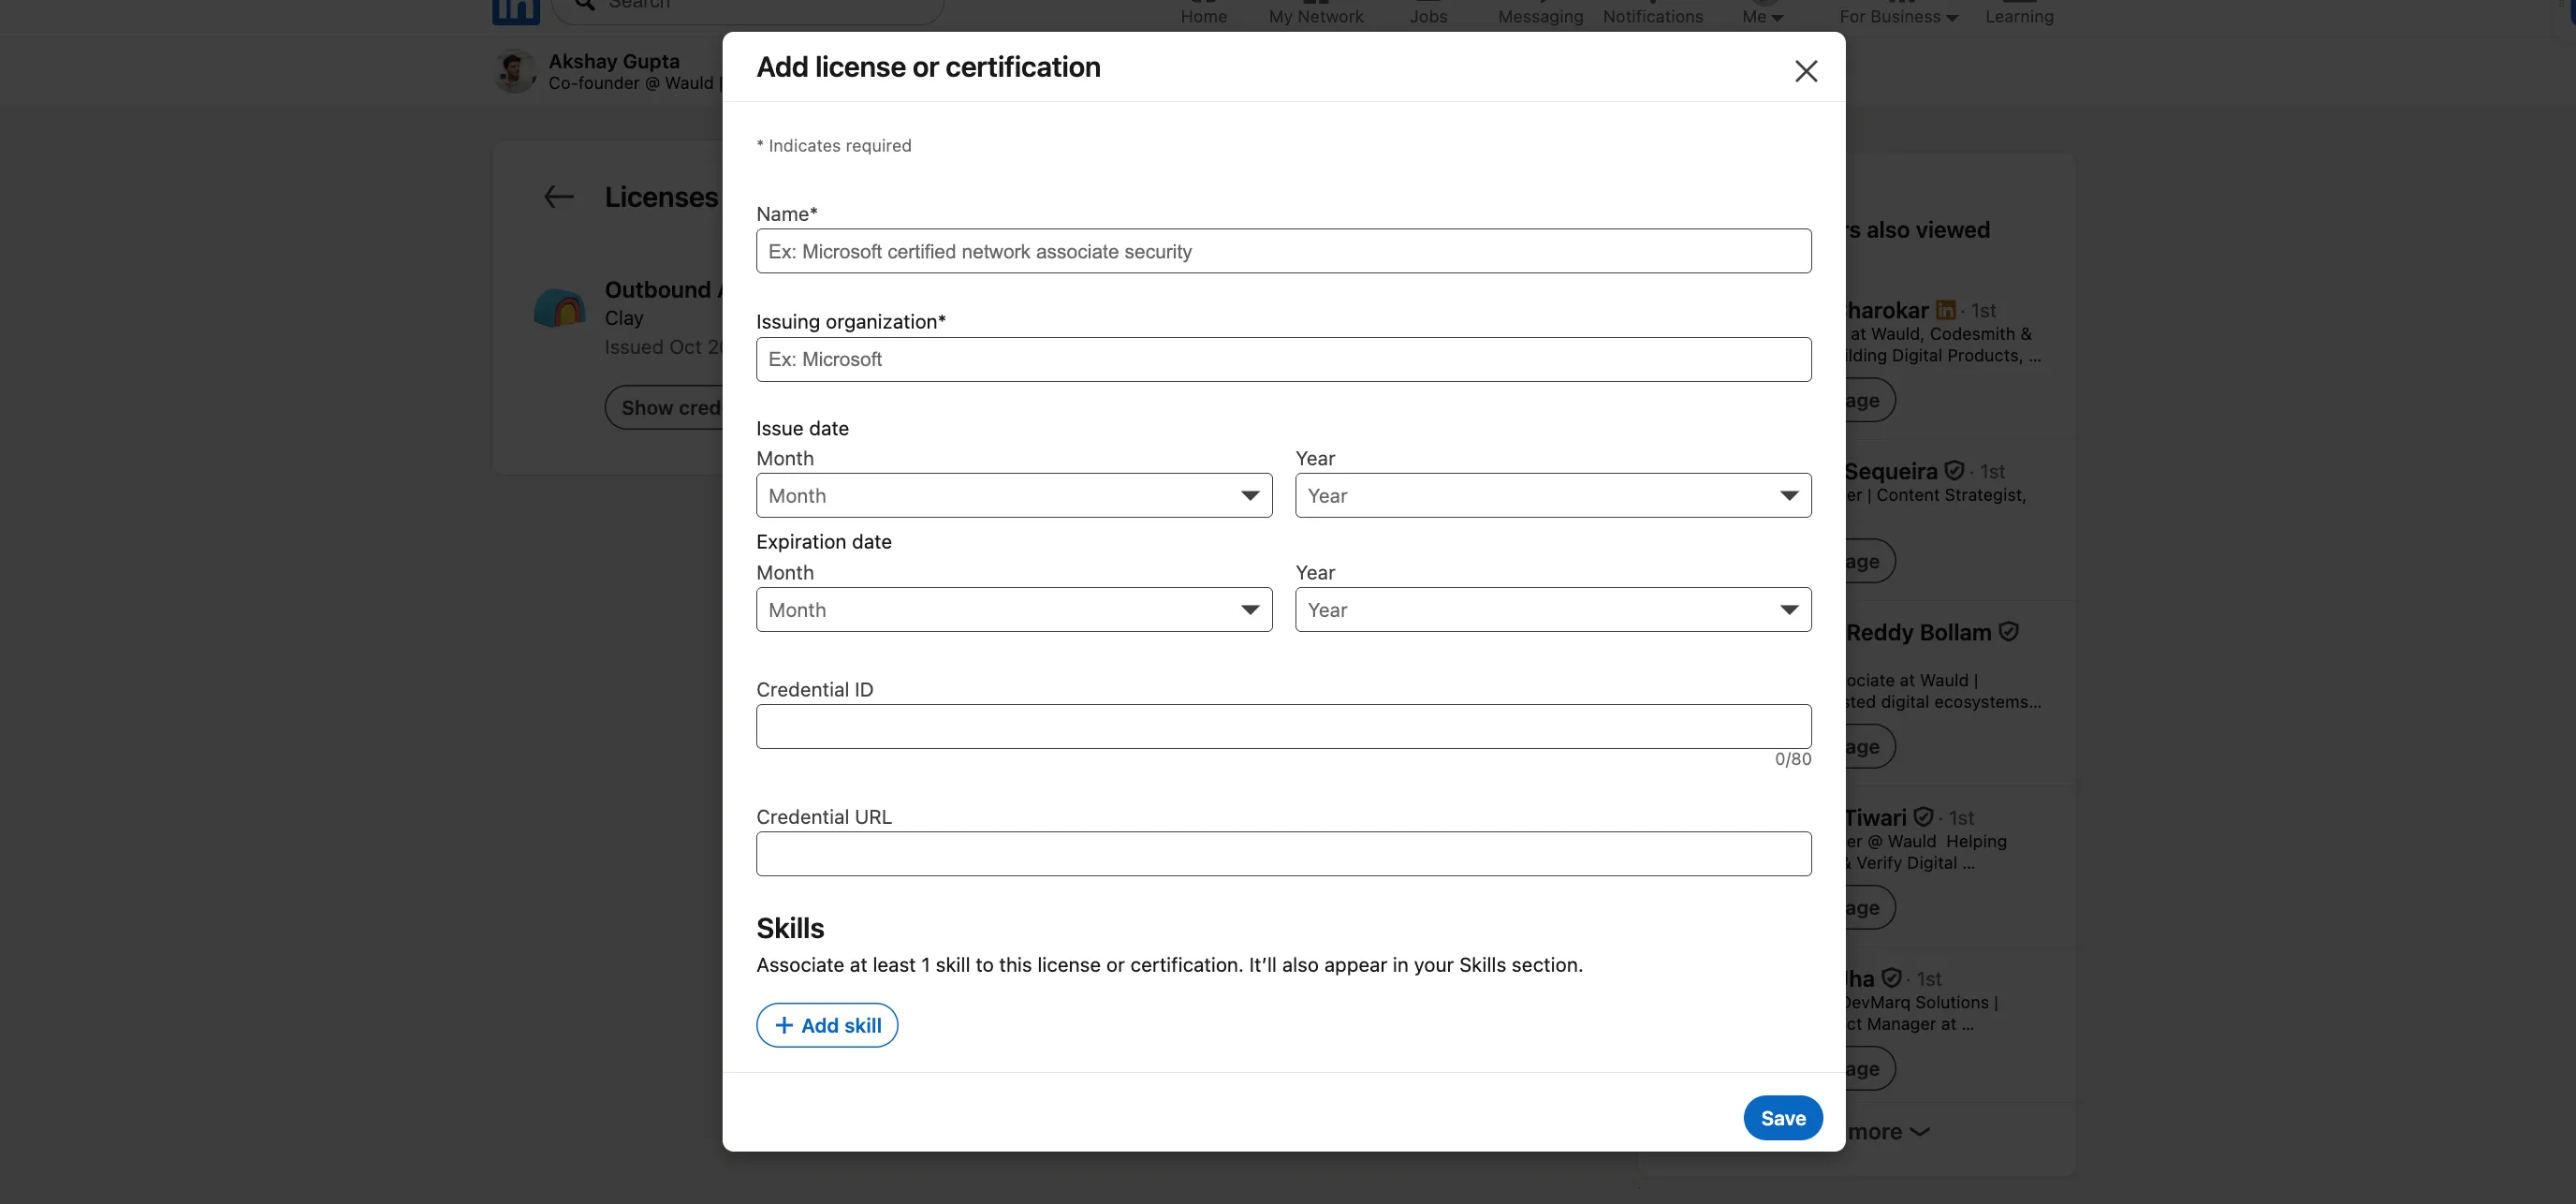
Here is the dialog you will be filling in, field by field. Note the line at the top: * Indicates required. Only Name and Issuing organization carry that asterisk, so everything below them is technically optional, which is exactly why so many entries end up unverifiable.
- 1
Open the form
From your profile, click Add profile section, open Recommended, then choose Add licenses & certifications. If you already have credentials listed, use the + icon on the existing Licenses & certifications section instead. Either way you land on the dialog above.
- 2
Name
The placeholder reads "Ex: Microsoft certified network associate security", which is a hint about length: LinkedIn expects the full official title, not a shortened version. Copy it exactly as your issuer wrote it.
- 3
Issuing organization
The placeholder here is just "Ex: Microsoft". Start typing and wait for the dropdown, then pick the real company page rather than leaving your text as plain text. Selecting from the dropdown is what attaches the issuer's logo to your entry.
- 4
Issue date and Expiration date
Both are Month and Year dropdowns, with no day, so you only need the month your badge was issued. If your badge does not expire, leave both Expiration date dropdowns untouched. There is no "does not expire" checkbox in this dialog; blank is how you say it.
- 5
Credential ID
The counter under the field reads 0/80, so you have 80 characters. Paste the reference your issuer assigned. Skip the field entirely if there is not one rather than inventing something.
- 6
Credential URL
The single most valuable field in the dialog, and the one most often left empty. Paste the public verification link. This is what gives the finished entry its Show credential button, the one visible on the existing credential behind the dialog.
- 7
Skills, then Save
The dialog says "Associate at least 1 skill to this license or certification. It'll also appear in your Skills section." Click Add skill and use the same wording as the skills already on your profile, since the entry feeds them rather than duplicating them. Then hit Save.
Once it is saved, open the credential URL in a private window. If it asks for a login, it is not proving anything to the recruiter who clicks it.
Doing it from your phone
The mobile app follows the same path. Tap your photo, then View Profile, scroll to Add section, and choose Licenses & certifications. The one thing that is genuinely fiddly on mobile is the credential URL, so either use the one-click route or email yourself the link before you start typing.
Announce it with a post
Adding the badge to your profile is quiet by design. Nobody gets notified, and it will not appear in anyone's feed. If you want the achievement seen, publish a short post as well.
A post that works usually has four parts:
- The badge image, at full resolution
- One line on what you can now do
- A tag for the issuing organization
- The verification link
Something like this is plenty:
I just earned the Product Analytics Badge from @Wauld Academy.
The part I did not expect to enjoy: building the funnel instrumentation from scratch, then arguing with the numbers for a week until they made sense.
Happy to compare notes if you are setting up analytics for the first time. Verify it here: wauld.com/verify/WA-1024
#ProductAnalytics #Certifications
Two things to avoid. Do not post the badge with no context, because "Excited to share that I've earned…" and nothing else gets scrolled past. And keep hashtags to two or three that match your target roles; a wall of them reads as spam and does not help reach.
Once the post is live, add it to your Featured section so it stays near the top of your profile instead of sinking down the feed after a day.
Where else the badge should show up
A certification entry on its own is a single data point. It earns much more when the rest of your profile agrees with it:
- Skills. Add the two to four skills the badge covers, worded the way a recruiter would search for them. LinkedIn's own research puts profiles with five or more skills at up to 17 times more views.
- About. A single sentence is enough: "Certified in product analytics, currently building event tracking for a B2B SaaS product."
- Headline. Worth it for the credentials your industry actually screens on, and not worth the space for anything else.
Common problems, and what causes them
| What you see | What is usually wrong |
|---|---|
| No logo next to the entry | The organization was typed as free text instead of picked from the dropdown. Edit and reselect it. |
| The credential URL does not open | The link is behind a login. Ask your issuer for the public verification page. |
| Nobody saw the badge you added | Profile edits are silent. Post about it, or turn on "Share profile updates with your network." |
| The badge appears under the wrong section | It was added as Education or Honors. Delete it and re-add it under Licenses & Certifications. |
If you are the one issuing the badges
Everything above is the recipient's side of the job, and every extra step is a recipient who starts and never finishes. If you run a course, a training program, or a certification, that drop-off is your reach leaking away.
Wauld gives every recipient a share window with the LinkedIn profile and feed options built in, prefilled with the credential name, issuer, issue date, and verification link, so the manual form above never comes up. The badges follow the Open Badge 3.0 standard, carry your branding, and link back to a live verification page that puts your name in front of everyone who checks. You can also see how many recipients actually shared, which is the number that tells you whether your credentials are working as marketing.
The short version
Copy the badge name, issuer, dates, credential ID, and verification URL. Use the one-click button if your issuer has one; otherwise add it under Licenses & Certifications and pick the organization from the dropdown so the logo shows. Post about it once with the image and the link, pin that post to Featured, and mirror the badge's skills in your Skills section.
Two minutes of work, and the badge finally does the job it was earned for.
Issue badges people actually share
Verified, branded digital badges your recipients can add to LinkedIn in one click.
FAQs about LinkedIn badges
Where do digital badges go on a LinkedIn profile? Under Licenses & certifications. LinkedIn has no separate badge section, so a badge and a certificate are the same kind of entry as far as the profile is concerned. What separates a strong entry from a weak one is not the type, it is whether you filled in the Credential URL.
Does LinkedIn verify my badge? No, and this surprises people. LinkedIn stores whatever you type into the form without checking it against the issuer. The verification happens when someone clicks your Credential URL and lands on the issuer's page. That is why the field matters so much: without it, your entry is a claim rather than proof.
Will the badge artwork show on my profile? Not in the certification entry itself. That entry is text plus the issuing organization's logo, which is why picking the company from the dropdown matters. If you want people to see the badge design, put it in a post and add that post to your Featured section.
Does my network get notified when I add a badge? No. Profile edits are silent by default. Either turn on "Share profile updates with your network" in your profile settings before you save, or publish a post about it, which gives you more control over the wording anyway.
What if my badge does not expire? Leave both Expiration date dropdowns untouched. There is no "does not expire" checkbox in LinkedIn's dialog, so blank is how you say it. Do not invent an expiry date to fill the space, because a credential that appears to have lapsed reads worse than one that never expires.
Is the Credential ID required? No. Only Name and Issuing organization carry the required asterisk. Add the ID if your issuer assigned one, since it helps anyone cross-checking your credential, and skip the field if they did not. LinkedIn caps it at 80 characters.
Can I add a badge from the LinkedIn mobile app? Yes, and the form is identical. Tap your photo, choose View Profile, scroll to Add section, then Licenses & certifications. The awkward part on a phone is the credential URL, so use your issuer's one-click button or email yourself the link first.
How many badges should I list? Enough to show a direction, not everything you have ever completed. A handful of credentials that point at the same skill tell a clearer story than a long list covering unrelated topics. If a badge no longer reflects the work you want, take it down.